When it comes to your shoulder workout, there's no need to leave the comfort of your own home. We've handpicked 12 dynamic exercises that will help you build impressive shoulder strength and definition right from your living room. Forget the hassle of commuting to the gym or the limitations of equipment availability. With these exercises, you'll be able to do strength training at home on a schedule tailored to suit your busy lifestyle. Are you ready? Let’s get started!
Anatomy of Your Shoulders
Understanding the anatomy of your shoulders is key to unlocking their full potential. The shoulder complex consists of various muscles and structures that work together to provide mobility, stability, and strength. At the center of it all are the deltoid muscles, which give the shoulders their rounded shape and are divided into three heads: the anterior (front), medial (middle), and posterior (rear) deltoids.
Surrounding the deltoids are other important muscles, such as the rotator cuff muscles (supraspinatus, infraspinatus, teres minor, and subscapularis), which play a vital role in stabilizing the shoulder joint. These muscles work in harmony to allow a wide range of upper body movements, including lifting, pushing, pulling, and reaching.
Beyond their aesthetic appeal, strong and well-conditioned shoulders are crucial for overall upper body function and stability. Whether you're lifting heavy objects, performing daily activities, or engaging in sports and fitness pursuits, your shoulders are involved in almost every upper body movement. Neglecting proper shoulder training can lead to imbalances, weakness, and even an increased risk of injuries, such as rotator cuff strains or impingements.
How to Warm Up Before Your Shoulder Workout
Before diving into your shoulder workout, it's crucial to prioritize a proper warm-up routine. Warming up your shoulders not only prepares the muscles, tendons, and ligaments for the upcoming workout but also helps prevent potential injuries.
The shoulders are a complex joint that requires sufficient blood flow and an increased range of motion. By incorporating dynamic stretches and mobility exercises into your warm-up, you can activate the muscles surrounding the shoulder joint and improve their flexibility. Here's how to get started:
- Start your warm-up with arm circles, both forward and backward, to gently engage the deltoids, rotator cuff, and scapular muscles. Follow this with shoulder rolls, rolling your shoulders forward and backward to loosen up the joints and release any tension.
- Next, move on to dynamic stretches. Arm swings, where you swing your arms forward and backward, help increase the range of motion in the shoulders. Additionally, shoulder dislocations, using a resistance band or towel, can effectively stretch the chest and shoulder muscles.
- To improve mobility, incorporate exercises such as shoulder circles, where you rotate your shoulders in a circular motion, and shoulder extensions, which involve reaching your arms backward as far as comfortably possible. These exercises promote fluid movement and enhance the overall flexibility of the shoulder joint.
Remember, dedicating just a few minutes to warm up can make a significant difference in your shoulder workout. It sets the stage for success by reducing the risk of injury, increasing range of motion, and optimizing performance. So, prioritize your shoulder warm-up routine and reap the rewards of a safer and more effective workout.
What You'll Need for a Shoulder Workout at Home
To embark on a successful shoulder workout at home, you'll need a home gym and a few essential pieces of equipment to target and challenge those muscles effectively. Here's a list of items to gather:
- Suspension Trainer: A TRX suspension trainer is a versatile tool that allows for a wide range of bodyweight exercises targeting the shoulders. It provides stability challenges and helps develop strength and control.
- Dumbbells: Dumbbells are a staple for any home gym setup. They offer the flexibility to perform various shoulder exercises with different resistance levels. Opt for a range of weights to accommodate your fitness level and progression.
- Strength Bands: Strength bands are lightweight and portable, making them ideal for an at-home shoulder workout. They add resistance throughout the range of motion, activating and strengthening the shoulder muscles effectively. You can pair your strength bands with a TRX Bandit for unmatched comfort and grip strength.
In addition to these essentials, there are optional equipment and items that can add variety and challenge to your shoulder exercises:
- Kettlebells: Kettlebells provide a unique training experience, engaging multiple muscles and promoting stability. They can be used for exercises like kettlebell swings, shoulder presses, or Turkish get-ups to add intensity and diversity to your routine. Of course, the Y-Bell is a great alternative since it acts as a kettlebell, dumbbell, and push-up stand in one. We personally use it for our at-home back workouts as well as our at-home bicep exercise.
- Medicine Ball: Incorporating a medicine ball into your shoulder workout allows for dynamic and explosive movements. Exercises like medicine ball slams, rotational throws, or wall balls can enhance power and core engagement.
- Yoga Mat: A yoga mat provides comfort and support during floor-based exercises, such as plank variations or yoga-inspired shoulder stretches. It's especially useful for those who prefer exercising on a cushioned surface.
In the event that you don't have access to specific equipment, don't worry! There are alternative exercises and modifications available:
- Suspension Trainer Alternatives: If you don't have a suspension trainer, you can substitute exercises with variations that use dumbbells or resistance bands. For example, instead of suspended push-ups, you can do regular push-ups or incline push-ups using a stable elevated surface.
- Dumbbell Substitutions: If dumbbells are not available, you can utilize household items like water bottles, filled backpacks, or cans of food as makeshift weights. Be creative with what you have on hand to maintain resistance.
- Resistance Band Modifications: If you don't have resistance bands, you can modify exercises by using dumbbells or even just bodyweight. For instance, lateral raises can be performed without bands by focusing on controlled and deliberate movements.
11. TRX Supine Y Deltoid Fly
One exercise that specifically targets the posterior deltoids and can be highly effective in your shoulder workout routine is the TRX Supine Y Deltoid Fly. This exercise not only engages the posterior deltoids but also activates the muscles of the upper back and core for a comprehensive upper-body workout.
- Begin by adjusting the TRX suspension trainer to a height that allows you to comfortably lie on your back while holding the handles with your palms facing down.
- Lie down on your back with your feet directly underneath the TRX anchor point. Your legs should be extended, and your core engaged.
- With your arms straight and in line with your shoulders, lift your back slightly off the ground, maintaining a neutral spine.
- Initiate the movement by squeezing your shoulder blades together and pulling your arms outward and upward, creating a Y shape with your body. Focus on contracting your posterior deltoids throughout the movement. Avoid bending your elbows or pulling out to a V
- Slowly return to the starting position while maintaining control over the straps and keeping tension in your posterior deltoids.
To adjust the difficulty level or progress to more advanced variations, consider the following:
- Gradually increase the range of motion by aiming to bring your arms closer together, begin with creating a V shape then progress to Y gradually progressing to the I fly
- Once you have mastered the basic form, you can incorporate additional resistance by using weighted vests for a more challenging workout.
10. Arnold Press
The Arnold Press is a highly effective compound exercise that engages multiple muscles in the shoulders, making it a staple in any comprehensive shoulder workout. Named after the legendary bodybuilder Arnold Schwarzenegger, this exercise targets not only the deltoids but also the trapezius and triceps, providing a well-rounded upper-body challenge.
- Begin by standing tall with a dumbbell in each hand, palms facing your body, and elbows bent at a 90-degree angle. Keep your feet shoulder-width apart for stability.
- Engage your core, maintain a neutral spine, and slightly retract your shoulder blades. This will create a solid foundation for the exercise.
- Press the dumbbells upward, rotating your palms away from your body. Continue the movement until your arms are fully extended overhead, with the dumbbells almost touching each other.
- Pause briefly at the top of the movement, feeling the contraction in your shoulders.
- Slowly lower the dumbbells back to the starting position, rotating your palms back toward your body.
- Repeat for the desired number of reps
To suit different fitness levels and goals, here are variations and modifications for the Arnold Press:
- If you're new to the Arnold Press or find it challenging, start with lighter weights or even no weights at all. Practice the motion using just your body weight, gradually adding resistance as you build strength and confidence.
- To increase the intensity, use progressive overload to increase the number of reps at your desired weight, once that weight becomes easy, increase the load.
- Alternating Arnold Press: Instead of pressing both dumbbells simultaneously, you can perform the Arnold Press one arm at a time. This variation adds an element of unilateral training, promoting balanced shoulder strength and stability.
Related: Hamstring Exercises You Can Do at Home
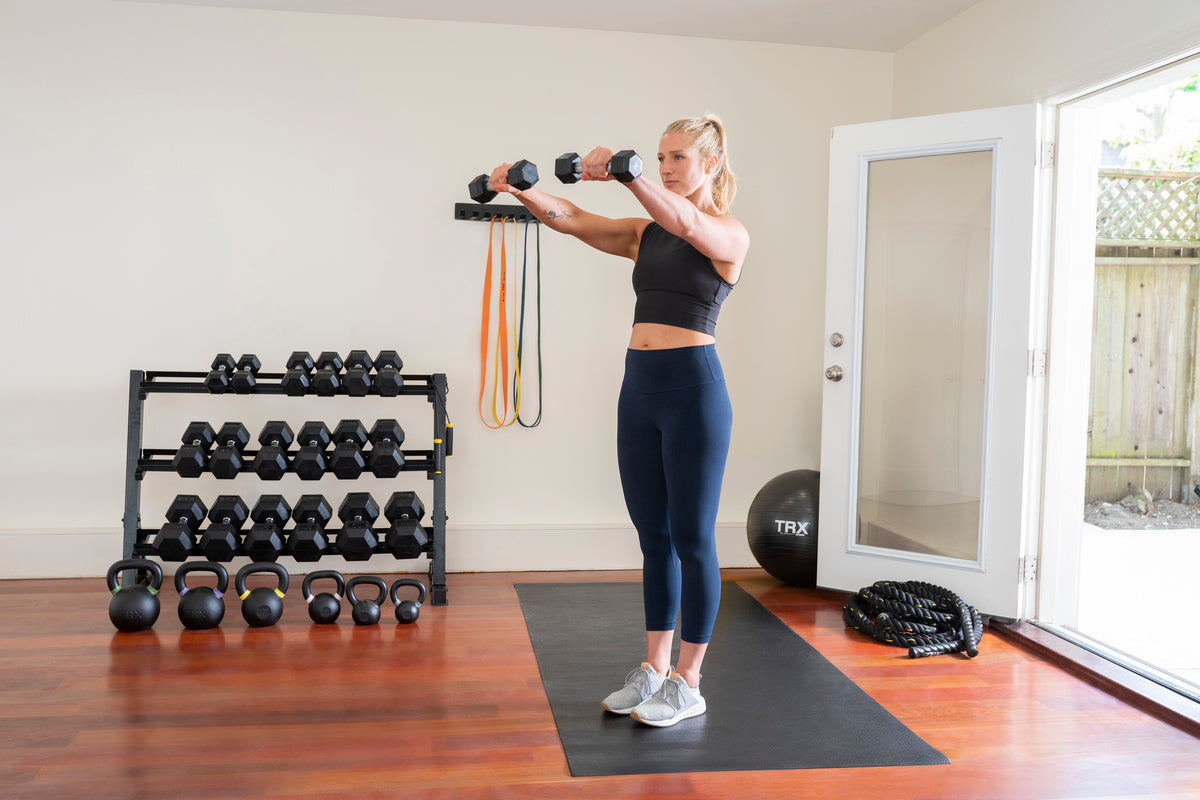
9. Front Deltoid Raise
The Front Deltoid Raise is a fantastic exercise that specifically targets and strengthens the anterior deltoid muscles, located at the front of your shoulders. By isolating this muscle group, you can enhance the overall shape and definition of your shoulders, resulting in a more balanced and sculpted upper body.
- Begin by standing tall with a dumbbell in each hand, palms facing your thighs. Keep your feet shoulder-width apart for stability.
- Engage your core, maintain a neutral spine, and slightly retract your shoulder blades. This will establish a solid foundation for the exercise.
- Simultaneously lift both dumbbells in front of you, leading with your elbows and keeping a slight bend in your arms. Continue lifting until your arms are parallel to the ground, or slightly below shoulder level. Keep your wrists straight throughout the movement.
- Pause briefly at the top of the movement, focusing on contracting your anterior deltoids.
- Slowly lower the dumbbells back to the starting position, maintaining control and resisting any swinging or momentum.
- Repeat for the desired number of reps
For variations and progressions to suit different fitness levels, consider the following:
- Use lighter weights or body weight: If you're new to front deltoid raises or focusing on technique, start with lighter weights or even practice the movement using just your body weight. This will help you establish proper form before progressing to heavier weights.
- Alternating front deltoid raises: Instead of lifting both dumbbells simultaneously, you can alternate the raises, lifting one arm at a time. This variation challenges stability and engages the core while maintaining focus on the anterior deltoids.
- Seated Front Deltoid Raises: Performing the exercise while seated on a bench or stability ball eliminates the use of momentum and engages the core and stabilizer muscles even further.
8. Dumbbell Bent-Over Row
Dumbbell bent-over rows offer a multitude of benefits for targeting the posterior deltoids and upper back. This compound exercise strengthens and develops the posterior deltoids, enhancing shoulder stability and reducing the risk of imbalances or injuries. Additionally, it engages the muscles of the upper back, including the latissimus dorsi, rhomboids, and trapezius, improving posture and alleviating upper back and neck pain. By targeting both sides of the body individually, dumbbell bent-over rows promote balanced muscle development and also enhance grip strength, resulting in improved pulling power and functional strength. Incorporating this exercise into your routine can help you achieve a strong, balanced, and well-defined upper body.
- Begin by standing with your feet shoulder-width apart, knees slightly bent. Hold a dumbbell in each hand, palms facing your body.
- Hinge forward at the hips, maintaining a flat back and keeping your core engaged. Allow your arms to hang naturally towards the floor, elbows slightly bent.
- Pull the dumbbells towards your sides, leading with your elbows. Focus on squeezing your shoulder blades together and keeping your back muscles engaged.
- Pause for a moment at the top of the movement, feeling the contraction in your back muscles.
- Slowly lower the dumbbells back to the starting position, maintaining control throughout the movement.
- Repeat for the desired number of reps
Here are a few tips to ensure the proper execution of Dumbbell Bent-Over Rows:
- Maintain a neutral spine and avoid rounding your back during the exercise. This helps protect your lower back and ensures proper muscle engagement.
- Keep your elbows close to your body as you pull the dumbbells, directing the movement towards the midline of your body. This targets the back muscles effectively.
- Choose a weight that challenges you without sacrificing proper form. The weight needs to be challenging enough to build your strength, without the need for momentum to complete the rep. Gradually increase the weight as your strength improves.
To target specific areas of the shoulders, try the following variations:
- Reverse Grip Rows: Instead of the traditional overhand grip, use an underhand grip. This variation places more emphasis on the anterior deltoids (front of the shoulders) and can help develop balanced shoulder strength.
- Neutral Grip Rows: Utilize dumbbells with a neutral grip, where your palms face each other. This grip variation targets the middle deltoids while also engaging the biceps and forearms.
- T-Raises: Instead of performing a traditional rowing motion, start with your arms hanging straight down, and raise them out to the sides to form a "T" shape. This exercise specifically targets the rear deltoids, promoting improved posture and balanced shoulder development.
- High Rows: Adjust your body position to a more upright stance and row the dumbbells towards your upper chest or collarbone area. This variation places greater emphasis on the upper traps and upper portion of the back, while still engaging the posterior deltoids.
- Single-Arm Rows: Perform the dumbbell bent-over row with one arm at a time. This unilateral variation allows you to focus on each side individually, addressing any muscle imbalances and enhancing overall shoulder stability.
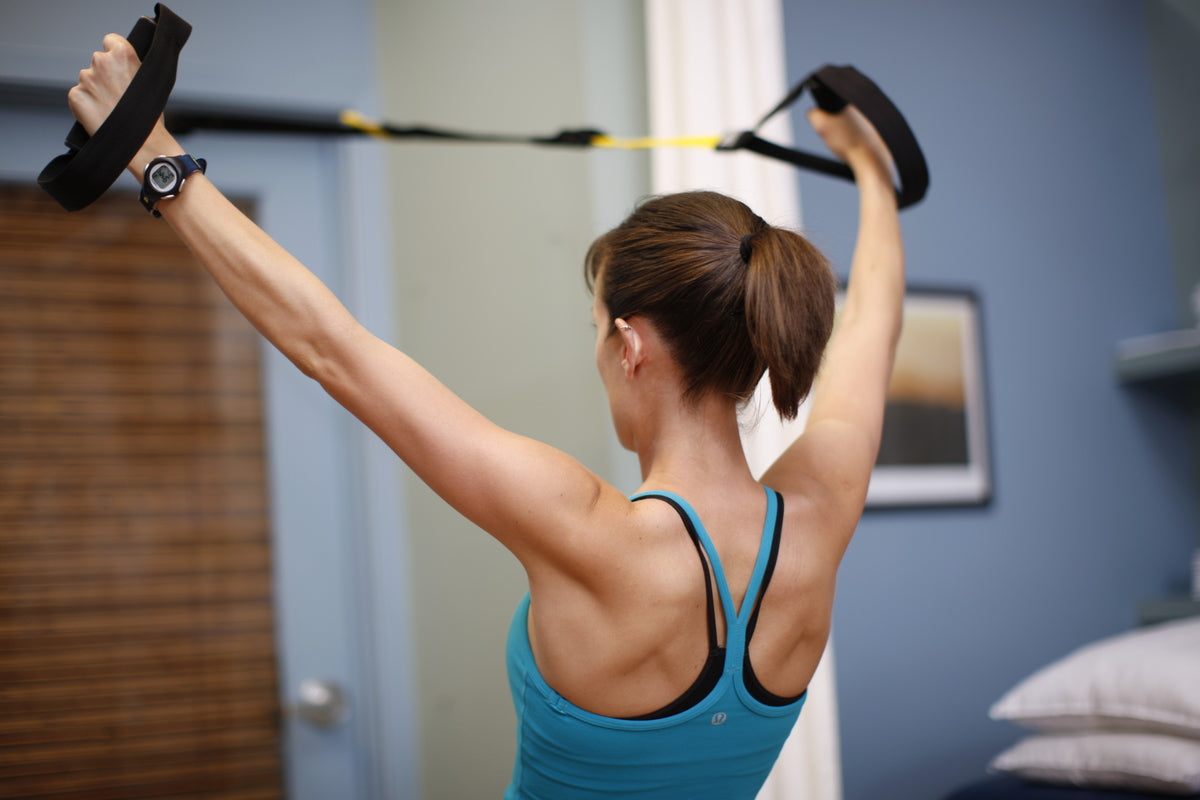
7. TRX Y Deltoid Fly
The TRX Y Deltoid Fly activates the deltoid muscles, including the anterior, medial, and posterior heads. By adjusting the angle and intensity of the exercise, you can effectively challenge and strengthen each part of the shoulder complex. The suspended nature of the TRX system requires significant engagement of the core and upper back muscles for stability. This exercise helps improve posture and overall upper body strength.
- Anchor the TRX straps securely to a stable overhead structure, such as a door frame, sturdy beam, or X-mount. Adjust the straps to mid-length
- Begin by facing the anchor point, holding one TRX handle in each hand. Position yourself so that your body is at a slight angle, leaning back with your arms extended straight in front of you.
- Maintain a plank position with your body, avoid braking at the hips or bending at the elbows
- Initiate the exercise by squeezing your shoulder blades together and pulling your arms upward and out to form a Y shape with your body, focusing on engaging your deltoid muscles.
- Maintain control and tension in the straps throughout the movement.
- Slowly return to the starting position, resisting the pull of the straps, and maintaining stability and control.
- Repeat for the desired number of reps
6. TRX High Rows
TRX High Rows primarily target the posterior deltoids, which are responsible for shoulder stability and a well-rounded shoulder appearance. Additionally, the exercise engages the upper back muscles, such as the rhomboids and trapezius, which play a crucial role in maintaining proper posture. As you perform TRX High Rows, the exercise also engages the muscles of the upper arm, including the biceps and forearms. This provides a comprehensive upper body workout.
- Adjust the TRX straps to fully lengthened.
- Stand facing the anchor point and hold one TRX handle in each hand with your palms facing down.
- Walk your feet forward and lean back to add resistance, create a plank position in your body.
- Begin the exercise with your arms fully extended, keeping a slight bend in your elbows. Your body should form a diagonal line from head to heels.
- Initiate the movement by squeezing your shoulder blades together and pulling your hands apart keeping your elbows in line with your shoulders
- Slowly extend your arms, returning to the starting position with control.
- Repeat for the desired number of reps.
Here are a few tips to maintain proper form and maximize the effectiveness of TRX High Rows:
- Keep your core engaged throughout the exercise to maintain stability and avoid excessive arching or sagging of the back.
- Focus on pulling with your back muscles rather than relying solely on your arms. Imagine squeezing your shoulder blades together as you perform the rowing motion.
- Maintain a controlled tempo throughout the exercise, avoiding any swinging or jerking movements.
- Keep your wrists neutral and avoid excessive bending or twisting. This ensures proper alignment and minimizes stress on the wrists.
5. Pike Pushup
The Pike Pushup is a fantastic bodyweight exercise that specifically targets the shoulders. It engages the deltoids, triceps, and upper chest muscles, making it an effective exercise for building shoulder strength and stability.
- Start in a high plank position with your hands slightly wider than shoulder-width apart and your feet hip-width apart. Your body should be in a straight line from head to heels.
- Lift your hips up towards the ceiling, forming an inverted V shape with your body. Lift your heels and shift your weight forward so that your shoulders come slightly forward of your wrists.
- Look between your hands
- Lower your upper body towards the ground by bending your elbows. Keep your elbows close to your body as you descend.
- When your head is just above the ground, push through your hands to extend your arms and return to the starting position.
- Repeat the movement for the desired number of reps
Here are some progressions and modifications to adjust the difficulty level:
- Decline Pike Pushup: To increase the challenge, elevate your feet on an elevated surface, such as a bench or step. This increases the range of motion and places more emphasis on the shoulders. For an added stability challenge perform the exercise using a TRX suspension trainer
- Elevated Pike Push Up: For beginners or those who need further modification, you can perform Pike Pushups with your hands on a yoga block. This reduces the range and places less stress on the shoulders while still targeting the same muscles.
4. Weighted Dips
Weighted dips require significant shoulder engagement, promoting the development of strong and stable shoulder muscles. This can enhance your performance in various upper body movements and reduce the risk of shoulder injuries, making them an excellent addition to your workout routine.
- Start by attaching a weight belt around your waist or holding a dumbbell between your legs. Choose a weight that challenges you while allowing you to maintain proper form throughout the exercise.
- Position yourself between parallel bars or dip bars, ensuring they are secure and stable. Place your hands on the bars, shoulder-width apart or slightly wider, with your palms facing inward.
- Lift yourself up, straighten your arms, and maintain an upright position. This is your starting position.
- Lower your body by bending your elbows and leaning slightly forward. Keep your torso stable and your elbows close to your body as you descend.
- Continue descending until your shoulders are below your elbows or until you feel a stretch in your chest and shoulders.
- Push through your hands and extend your arms to lift your body back to the starting position, maintaining control and stability throughout the movement.
- Repeat the movement for the desired number of reps
Here are some tips for adding weight progressively and incorporating variations:
- Start with a weight that allows you to complete the desired number of repetitions with proper form. Gradually increase the weight as your strength and technique improve.
- Use a weight belt or vest that allows for incremental increases in resistance, ensuring a steady progression over time.
- To increase the difficulty, you can perform weighted dips using rings instead of parallel bars. This challenges stability and engages additional stabilizer muscles.
- For those who are unable to perform full-weighted dips, start with assisted dips using a resistance band or machine. Gradually reduce assistance as you build strength.
3. Dolphin Dives
- Introduce dolphin dives as an exercise that targets the shoulders, core, and upper body.
- Provide step-by-step instructions on how to perform dolphin dives correctly.
- Offer modifications and progressions to accommodate different fitness levels.
Dolphin Dives are a dynamic exercise that effectively targets the shoulders, core, and upper body muscles. This exercise combines elements of shoulder mobility and core stability, making it a valuable addition to your workout routine.
- Begin in a push-up position with your hands slightly wider than shoulder-width apart and your feet hip-width apart. Keep your body in a straight line from head to heels.
- Engage your core and lift your hips up towards the ceiling, forming an inverted V shape with your body. Your head should be positioned between your arms.
- Lower your head and shoulders towards the ground by bending your elbows, allowing your forearms to come in contact with the floor/mat.
- Continue lowering your upper body until your forearms are parallel to the ground, or you feel a deep stretch in your shoulders and upper back.
- Push through your forearms and extend your arms, lifting your head and shoulders back up to the starting position. Maintain control and stability throughout the movement.
- Repeat the movement for the desired number of reps
Here are some modifications and progressions to accommodate different fitness levels:
- If you're new to Dolphin Dives or find the full exercise challenging, you can start with a modified version by bending your knees slightly. This reduces the load on the shoulders and allows for a more manageable movement.
- To increase the difficulty of Dolphin Dives, you can add a push-up at the bottom of the movement. After lowering your forearms to the ground, push through your hands to extend your arms fully before returning to the starting position.
- For an added challenge, perform Dolphin Dives using sliders or towels under your forearms. This increases the instability and requires greater core activation and shoulder control.
2. Plank Raise Tap Crunch
Plank Raise Tap Crunches primarily target the shoulders, engaging the deltoids and stabilizer muscles. The exercise also activates the entire core, including the rectus abdominis, transverse abdominis, and obliques. The twisting motion involved in tapping the opposite hand to the opposite foot further engages the oblique muscles for improved core strength and stability.
- Start in a high plank position with your hands directly under your shoulders, fingers spread wide for stability, and feet hip-width apart.
- Engage your core by drawing your belly button towards your spine and maintain a straight line from your head to your heels.
- While keeping your core engaged and hips stable, raise your right hand off the ground reach the arm forward and then reach back and tap your left foot, bringing them together in a crunching motion.
- Return your hand and foot to the starting position and repeat the movement on the opposite side, raising your left hand reaching forwards, and then tapping your right foot.
- Continue alternating sides while maintaining proper form and control throughout the exercise.
- Repeat the movement for the desired number of reps
Stability and Alignment Tips:
- Keep your core engaged and your hips level throughout the exercise. Avoid lifting or sagging your hips, as this can compromise stability and proper muscle activation.
- Focus on maintaining a neutral spine, avoiding excessive rounding or arching of the back. This helps prevent strain on the lower back and promotes proper alignment.
- Control the movement and avoid any jerking or swinging motions. Emphasize the connection between the shoulder and core muscles, ensuring smooth and controlled movements.
- Breathe steadily throughout the exercise, exhaling as you raise your hand and foot and inhaling as you return to the starting position.
1. Deep Swimmers Press
The Deep Swimmer's Press is a compound movement that combines a shoulder press with a horizontal rowing motion, providing a comprehensive workout for your upper body.
- Begin by standing with your feet shoulder-width apart, holding a dumbbell in each hand with an underhand grip (palms facing up). Position your arms in a half bicep curl position, with your elbows bent at approximately 90 degrees. This is your starting position.
- Engage your core muscles and maintain an upright posture with your shoulders relaxed.
- From the half-bicep curl position, simultaneously extend your arms overhead, pressing the dumbbells up towards the ceiling.
- As you press the dumbbells overhead, rotate your palms to face forward, creating a neutral grip position at the top of the movement.
- Once your arms are fully extended overhead, pause for a moment, feeling the engagement in your shoulders and upper back.
- Slowly lower the dumbbells back down to the starting position by bending your elbows, and returning to the half-bicep curl position.
- Repeat the movement for the desired number of repetitions, maintaining control and proper form throughout.
If you are new to the Deep Swimmer's Press or working on building strength, start with lighter dumbbells or even body weight. Focus on mastering the proper form and gradually increase the resistance as you progress.
Instead of pressing both dumbbells simultaneously, you can perform the exercise with one arm at a time. This variation helps improve muscle balance and stability.
Try this Shoulder Workout at Home
Here's a sample shoulder workout routine that you can do at home, incorporating the exercises mentioned above:
Start with a dynamic warm-up routine that includes arm circles, shoulder rolls, and shoulder
mobility drills. Spend 5-10 minutes to prepare your shoulders for the workout.
TRX Supine Y Deltoid Fly
- Reps: 10-12
- Sets: 3
- Rest: 45 seconds
Arnold Press
- Reps: 8-10
- Sets: 3
- Rest: 60 seconds
Front Deltoid Raise
- Reps: 12-15
- Sets: 3
- Rest: 45 seconds
Dumbbell Bent-Over Row
- Reps: 10-12
- Sets: 3
- Rest: 60 seconds
TRX High Rows
- Reps: 8-10
- Sets: 3
- Rest: 45 seconds
Deep Swimmer's Press
- Reps: 8-10
- Sets: 3
- Rest: 60 seconds
Finish the workout with a few minutes of static stretching for the shoulders and upper body. Focus on stretching the muscles you worked on during the workout.
Remember to warm up properly, focus on technique, and allow yourself adequate rest and recovery between workouts. With consistency and progression, this shoulder workout routine will help you develop strong, sculpted, and functional shoulders at home.
If you target your shoulders as part of a workout split, try adding our resistance band arm workout to add some extra burn. Or just try our shoulder supersets to get a bigger pump.
Conclusion
Now, you have an arsenal of shoulder exercises that you can do at home. From dumbbell bent-over rows to TRX Y deltoid flys, you can sculpt your shoulders or combine them with other exercises to get a full body workout at home.
Remember: form is the secret sauce that unlocks the true potential of these exercises. So stand tall, engage those muscles, and focus on perfecting each movement. With proper technique and a dash of persistence, you'll pave the way to shoulder greatness.