News

TRX
TRX Workout for Golfers
This TRX golf workout addresses all planes of motion, making it the perfect complement to your golf training equipment setup. Making sure your golf workout program addresses all of these components of fitness means you have to pick an efficient and effective way to train. Enter the TRX. I was first introduced to the TRX while still working as a strength and conditioning coach on the PGA and LPGA Tours. I immediately saw the potential to change the way we train golfers. Unloading movements to create the appropriate range of motion, balance and muscle sequencing leads to dramatic improvements in training results.
Swing components such as weight shifts, balance, staying on swing plane, shoulder turn, core stability and hip rotation all have physical requirements you can address using the TRX more effectively than any other training tool. Want to find the perfect TRX exercises for your specific golf goals? Take our quick assessment quiz to get a customized training plan that targets your unique needs on the course. The TRX Golf Workout DVD is produced in conjunction with Titleist Performance Institute and Dr. Greg Rose, both leaders in golf performance and fitness. Here, we have selected exercises from the DVD and put together a workout to improve your performance on the range and the course. We address all planes of motion, core stability, shoulder mobility, single leg and single arm exercises.
TAKE OUR TRAINING QUIZ
This workout is guaranteed to take your golf fitness to the next level!
Try one of our TRX products today:
TRX® PRO4 SYSTEM
BUY NOW
TRX® HOME2 SYSTEM
BUY NOW
TRX® TACTICAL GYM
BUY NOW
As the resident TRX Professor, Chris Frankel draws from over 25 years of experience as a strength and conditioning coach. He earned an MS in Exercise Physiology from the University of New Mexico, where he is currently completing his doctorate in Exercise Science. Before taking the position of Director of Programming at TRX, Chris was an instructor in the Department of Health, Exercise and Sport Sciences at the University of New Mexico.
TRX Workout for Firefighters and EMTs from Coach Dos
Read the profile below to find out how firefighters at the Orange County Fire Authority have integrated the TRX into their training. And to make sure you’re ready when the alarm goes off, we’ve got one helluva workout coming at you from Coach Dos (in video below) that can be used by all emergency rescue personnel, no matter the uniform.
The Orange County Fire Authority (OCFA), located in Irvine, California, has a big job on its hands. Consisting of 62 fire stations, the regional fire service agency serves 22 cities and over 1,380,000 residents in Orange County. Serious responsibility calls for serious training, and that’s why the OCFA has turned to the TRX.
Marty Driscoll (above), the Wellness Program Coordinator at OCFA, was first introduced to the TRX by his predecessor in February 2009. Because of its portable and compact nature, Driscoll saw the massive potential for the TRX and purchased 70 TRXs for use in his fire stations in the summer of 2009.
The reaction to the TRX was a slow burn to start. “Initially, I think our folks were a little reluctant to pick up the straps and give it a go,” says Driscoll. “However, once our firefighters actually gave the TRX a shot, the momentum really shifted. We’ve even had several individuals purchase TRXs for home use.”
The best part of the TRX for Driscoll is the variety it affords.” Some days I’ll do a full workout using only the TRX. Some days it’s part of a circuit, and some days I’ll use it to stretch out. The versatility is outstanding.”
Strength, power and endurance are critical to firefighters, so workouts are focused on multi-joint, total body exercises that utilize varying loads and replicate the biomechanics of the lifting, carrying, pulling, climbing and cutting that are often performed while on duty. “The TRX is a great tool to help us accomplish our fitness objectives,” says Driscoll. “It allows us to train the movements we perform on the job, it gets the heart rate up and provides a way to lengthen and strengthen the muscles and joints of the body.”
Exercises such as the TRX Squat, TRX Lunge, TRX Chest Press and TRX Push-up are favorites at the OCFA; they increase the strength and strength endurance for firefighters to lift heavy objects, operate charged hoses, carry victims and wear heavy protective gear.
“To me, being fit means being ready. For anything,” says Driscoll. “Mentally and physically. Whether it’s a structure fire at 2am, a vegetation fire in 100 degree weather, wrestling with my nephews, a bike race or surfing, you need to keep your head straight, your body fueled, physically prepared and well rested. And with the TRX, I can do all of that. It’s great.”
And here, as promised, are some awesome TRX exercises for all you firefighters, EMTs, first responders, police officers... anyone whose daily workout routine is designed to prepare you for a job that is often anything but routine.

TRX Workout for Cycling
Many of today's top professional cyclists in the peloton such as Team RadioShack Nissan Trek are currently using the TRX as part of their training regime throughout the year. Want to train like the pros? Take our quick assessment quiz to get a personalized TRX training plan designed specifically for cyclists.
TAKE OUR TRAINING QUIZ
For those of you who want to train like Fabian Cancellare, Jens Voight, and the Schleck brothers, Dan McDonogh, TRX Group Programming and Development Manager, has created an awesome TRX workout designed to increase core and leg strength as well as balance and flexibility in cyclists, so you can execute with more power (and less fatigue!) on the bike.
If you are looking for more exercises to increase your performance on the bike, check out the TRX Endurance Athlete Workout.
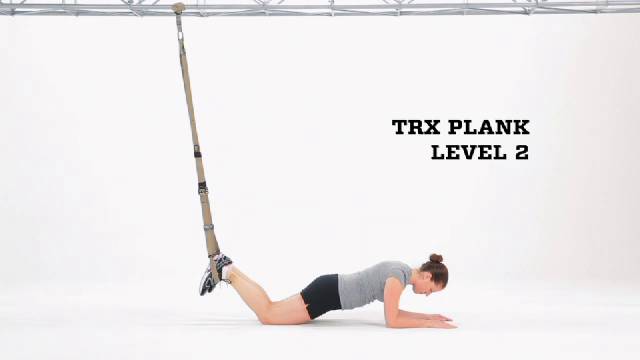
TRX Weekly Exercise: TRX Plank
The TRX Plank is the cornerstone position for any exercise on the TRX, and should be the core of any core training program. Want to perfect your plank form? Take our quick assessment quiz to get a personalized plan that builds a strong foundation. It is the single most important exercise to master because it applies to almost every physical thing you do.
TAKE OUR TRAINING QUIZ
Start with your knees, palms and forearms on the ground and your feet directly under the anchor point. Drive up into a plank with a solid core contraction. Your contraction should drive this movement. You’ll know that you are in the correct position when your ears, shoulders, hips, knees and ankles are all in line. This is the position you need to hold for the entire duration of this exercise.
Take mental note of the way this position feels, how engaged your core, glutes and back are, and remember it. There will be a test later. This position plays a critical role in almost every movement on the TRX as well as in just about every kind of strength training you will perform. Think about your position at the top of a dead lift, squat or hard-style kettlebell swing, if you have done it right, you will feel the same type of core engagement as you do when you execute a TRX Plank.
Now plank up and get after it.
For an expansive exercise library featuring over 50 different TRX exercises and a 12-week progressive workout program, check out the TRX FORCE: Tactical Conditioning Program .
TRX Weekly Exercise: TRX Single-Arm Row
The TRX Single Arm Row can be used to develop unilateral strength as well as challenge the core, arms and back. Want to find the right TRX row variations for your strength level? Take our quick assessment quiz to get a personalized training plan. To perform this exercise:
TAKE OUR TRAINING QUIZ
Pull your working arm to your side and activate your whole core as though you are holding a standing plank
Lower your body in one smooth controlled movement.
Pause for a moment at the bottom to reengage your core
Use your lat and arm to pull you back up to the start position
While executing this exercise engage your abs, obliques and lower back, and keep your shoulders, hips and knees in line. Your chest and hips should reach each end range of motion at the same time.This exercise can be made more difficult by narrowing your foot position to add more instability or by bringing your feet closer to the anchor point which increases the percentage of your bodyweight you have to lift.For an expansive exercise library featuring over 50 different TRX exercises and a 12-week progressive workout program, check out the TRX FORCE Super App.
Do your next workout with our TRX equipment:
TRX® PRO4 SYSTEM
BUY NOW
TRX® HOME2 SYSTEM
BUY NOW
TRX® TACTICAL GYM
BUY NOW
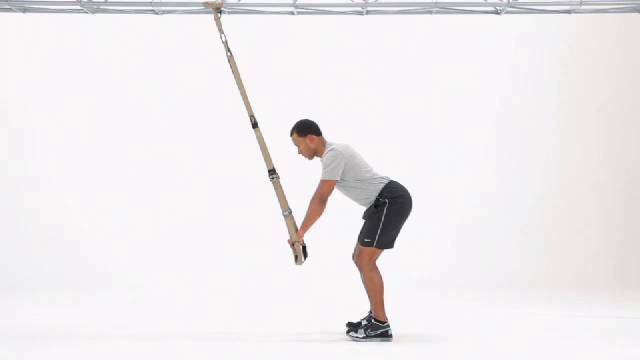
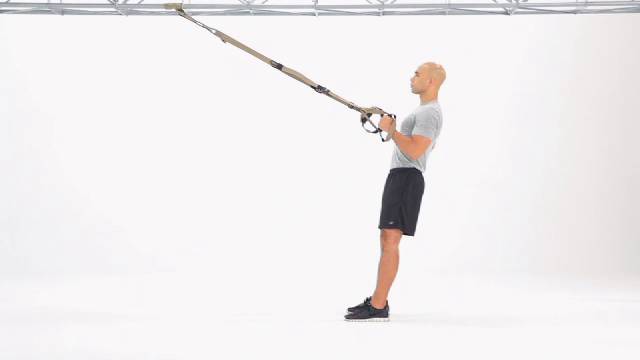
TRX Weekly Exercise: TRX Hinge
The TRX Hinge is an intense and unique exercise for challenging the anterior core and for teaching separation of hip and spine movement. Want to find the right TRX core exercises for your fitness level? Take our quick assessment quiz to get a personalized training plan. Your TRX should be adjusted to mid length, with your shins in a vertical position and your feet shoulder-width apart. Drive your hips forward and roll-out into a plank position with your hands out in front of you. Keep your core braced throughout the full range of motion.
TAKE OUR TRAINING QUIZ
Your hips should initiate your return as though there were a string tied around your waist to pull you back to the start position. This return will most likely be more of a challenge than the roll-out, so make sure you save some gas in the tank to bring you back home.
For an expansive exercise library featuring over 50 different TRX exercises and a 12-week progressive workout program, check out the TRX FORCE Tactical Conditioning Program.
TRX Upper-Body Workout from LIVESTRONG
This TRX upper-body workout develops strength in your arms, chest, back and core, with movements that translate to the way you move in every-day life. Try adding this workout to your training regimen to get a taste of how Suspension Training can take your fitness to the next level.
Suggested Workout Routine:Before diving into these exercises, take our quick fitness assessment quiz to find the perfect rep ranges and modifications for your level. Perform 5-8 reps of each exercise. Move through each exercise without rest until you get to the end, then rest for 3-5 minutes and repeat the entire series 2-5 times.
TAKE OUR TRAINING QUIZ
Exercise One:TRX Y Deltoid FlyDevelop mobility in your shoulders and strength in your core with this upper-body exercise.
Set Up:Stand facing the anchor point holding the TRX handles, with your hands extended over your head and your feet in a slightly offset stance. Brace your core and focus on keeping your elbows, hips and knees in line.
Movement:Slowly lower your hands down in front of your chest while keeping your arms straight. Think of your chest, back, core and hips as one, solid moving plank - everything should move together in one seamless motion.
Finish:To return drive your hands back over your head. Focus on keeping your core stable and your shoulders mobile.
Exercise Two:TRX Chest PressBuild strength in your chest, shoulders and triceps with this TRX exercise.
Set Up:Stand facing away from the anchor point with the your hands holding the handles out in front of you. Brace your core and focus on holding a solid plank.
Movement:Lower your chest towards your hands, and focus on moving your entire body as a plank. Stop when your hands are in line with your chest.
Return:Press yourself back up in one slow controlled movement, focus on keeping your knees, hips and shoulders in line the entire way up.
Exercise Three:Squat Y FlyBuild strength and increase mobility in the shoulders and hips
Set Up:Stand facing the anchor point with your hands extended overhead, holding the Suspension Trainer by the handles.
Movement:Move your hips down and back, and push your knees out, while simultaneously lowering your hands to shoulder level.
Return:Drive through your heels and push your hips forward while raising your hands back overhead, maintaining straight arms until you reach the top.
Exercise Four: Triceps PressIncrease strength and definition in the triceps while developing your core strength and improving your active plank.
Set Up:Stand facing away from the anchor point, holding the Suspension Trainer by the handles. Keep your elbows high and in line with your shoulders. Put your hands next to your temples with your palms facing away from your body. Brace your core and focus on maintaining tension throughout your entire body.
Movement:Press down into the handle, keeping everything stable except for your elbow joint, until your arms are fully extended.
Return:Lower your body down in one slow, controlled movement until your hands are back at the start position.
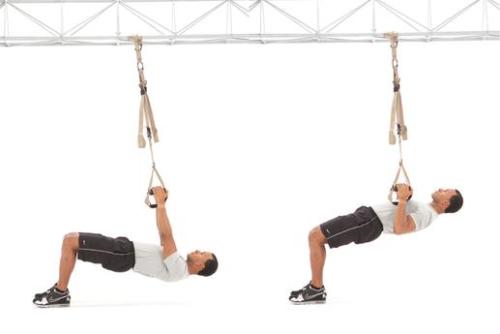
Exercise Five:Inverted RowThis exercise is excellent for developing integrated core, upper and lower back strength.
Set Up: Face the Suspension Trainer with your chest directly under the anchor point, holding on to the handles with your palms facing each other. Bend your knees to 90 degrees, brace your core and squeeze your glutes.
Movement:Squeeze your shoulder blades together and use your lats to pull your body up until your hands are at the side of your rib cage.
Return:Slowly lower your body back down to the start position.
Exercise Six:Atomic PikeAn incredible, total-body challenge this move is excellent for strengthening your whole upper body.
Start:Get in a pushup position with your feet in the foot cradles of the Suspension Trainer, directly under the anchor point.
Movement:Brace your core and perform a pushup. When you reach the top of the push up, pause for a moment and pike your hips up while keeping your legs as straight as you can.
Return:Pause for a moment at the top, then lower your hips back down to the start position.
Exercise Seven:Pull UpThis TRX variation of a bodyweight training classic will strengthen your arms, shoulders, back and core.
Start:With the handles of the Suspension Trainer over shortened, sit directly under the anchor point holding the handles with your legs in an L-sit position.
Movement:Pull your chest to your hands while keeping your legs at a 90-degree angle from your torso.
Return:Lower your self to the ground in one slow and controlled movement and reset when you hit the ground.
Exercise Eight:Resisted Torso RotationA great exercise for developing functional core strength, this exercises challenges the entire upper body.
Set Up:Stand sideways to the anchor point, with your feet slightly offset holding one handle with both hands at the center of your chest. Brace your core and lean slightly away from the anchor point.
Movement:While keeping your hips, knees, shoulders and ears in line, press your hands away from your chest.
Return:Slowly pull your hands back to your chest.
Repeat on both sides.
Exercise Nine: PowerPullAn excellent total-body exercise, this move is perfect for developing rotational strength.
Set Up: Stand facing the anchor point, holding one handle of the Suspension Trainer with one hand tucked into your side and your free hand reaching up toward the anchor point. Brace your core and focus on maintaining a solid plank position.
Movement:Slowly lower your body away from the anchor point with your working hand, letting yourself rotate away, until your non-working hand is reaching toward the ground. Maintain your plank.
Return:Pull yourself back to the start position in one controlled movement until your non-working hand is touching the Suspension Trainer.
Repeat on both sides.
If you don't have a suspension trainer, pick one up today.
TRX® PRO4 SYSTEM
BUY NOW
TRX® HOME2 SYSTEM
BUY NOW
TRX® TACTICAL GYM
BUY NOW
This workout was originally featured on livestrong.com, get the whole story here.

TRX Triceps Press
Your core serves as the pivotal connector between your upper and lower body, and it's the powerhouse behind your movements. Core muscles orchestrate the way your abdominal and back muscles operate in sync to provide support and stability to your spine.
By strengthening a robust core, you're laying the groundwork for all physical activities, ranging from simple tasks such as sitting, standing or bending, to more complex ones like a High-Intensity Resistance Training (HIRT) workout using your YBells. Not sure which core exercises are right for your current fitness level? Take our quick assessment quiz to get a personalized core workout plan tailored to your goals and experience.
TAKE OUR TRAINING QUIZ
The importance of core muscles and core exercises cannot be overstated when it comes to developing a chiseled 6-pack. While aerobic exercises are necessary to burn abdominal fat, core exercises play a crucial role in fortifying the muscles around the abdomen. They also aid in sculpting and defining your abs.
Before you learn how to do a TRX Tricep Press, you're going to need a suspension trainer:
TRX® PRO4 SYSTEM
BUY NOW
TRX® HOME2 SYSTEM
BUY NOW
TRX® TACTICAL GYM
BUY NOW
Fraser Quelch is Director of Training and Development for TRX. He is also a featured fitness author and a competitive ironman triathlete.
TRX Training Workouts: A Program for Every Goal
You've got your gear, you've got your goal, and you're ready to roll. Now all you need is a plan. TRX has you covered there, too.
No matter what your goal is for 2012, the new 12-week progressive TRX FORCE Tactical Conditioning Program is a great way to kick off the year. Though originally designed to deliver the strength, mobility and endurance that military service members need to be operationally ready, it’s a great program for anyone who wants to take giant leaps forward in their personal fitness. Here’s quick video overview:
All 70+ exercises in the program, and their associated progressions, are demonstrated in the massive exercise library in the program DVD and highlighted in the pull-out exercise maps. Want to find the perfect starting point in your fitness journey? Take our quick assessment quiz to get a personalized selection from our exercise library that matches your goals.
TAKE OUR TRAINING QUIZ
At the end of the day you not only have a great 12-week plan, but you have all the ingredients for many more weeks of training.
New! TRX Workouts are Now Available as Downloads!We recently took our extensive library of workout DVDs and turned them into downloads. So if instead of a 12-week plan, you want a bunch of one-off workouts that you can take with you on your mobile device, you can now purchase them in the TRX Shop.
Plus, without all the packaging, manufacturing, shipping and handling of a DVD, the price is gentler on the wallet. Take TRX Essentials: Cardio Circuit, for example. The DVD is $34.95 while the digital download is $14.95 – a savings of $20. Use the money you saved to get TRX Essentials: Strength for $14.95 and still come out $5 ahead.
Grab the brand new TRX FORCE Tactical Conditioning Program in the shop or browse all TRX workouts.