News
The Randy Hetrick and Drew Brees TRX Workout
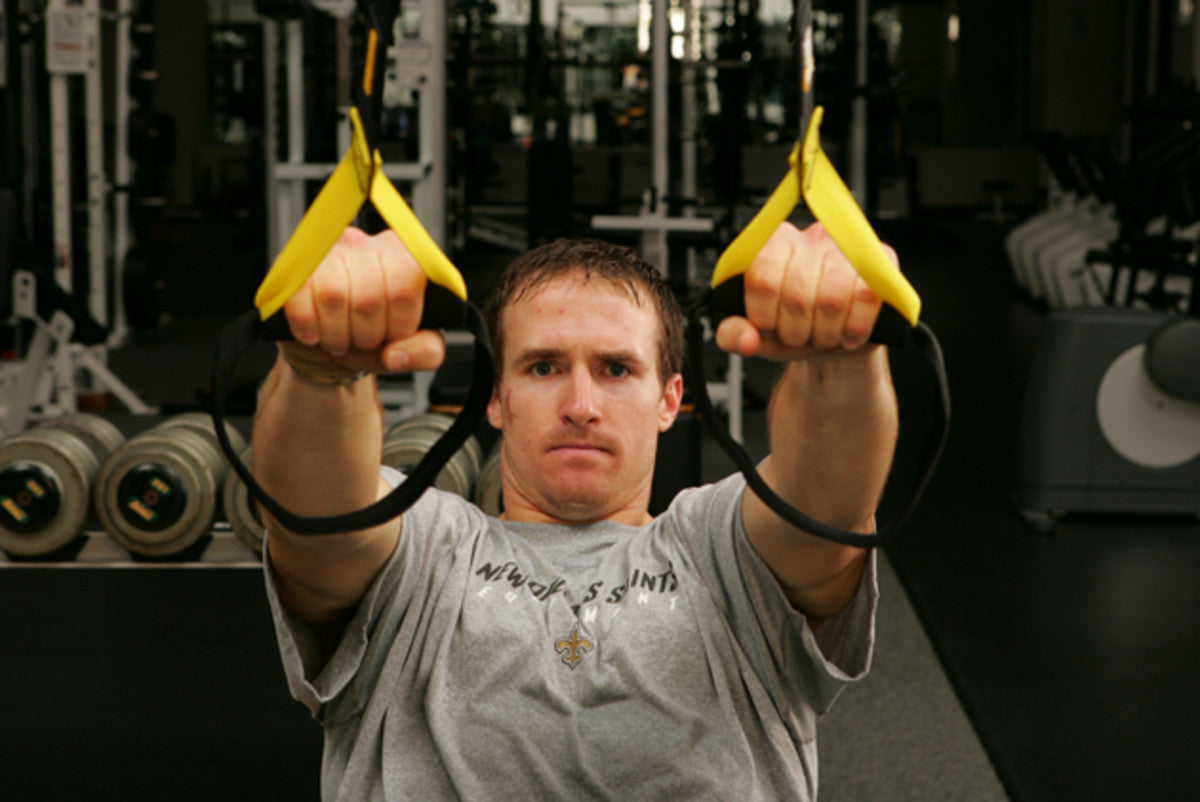
Check out this intense Guns and Gut Gauntlet from Men's Health, featuring Todd Durkin, Drew Brees and TRX CEO Randy Hetrick. Before taking on their time, try our quick fitness assessment quiz to get a personalized workout plan that'll help you crush challenges like this. Can you beat their time?
TAKE OUR TRAINING QUIZ
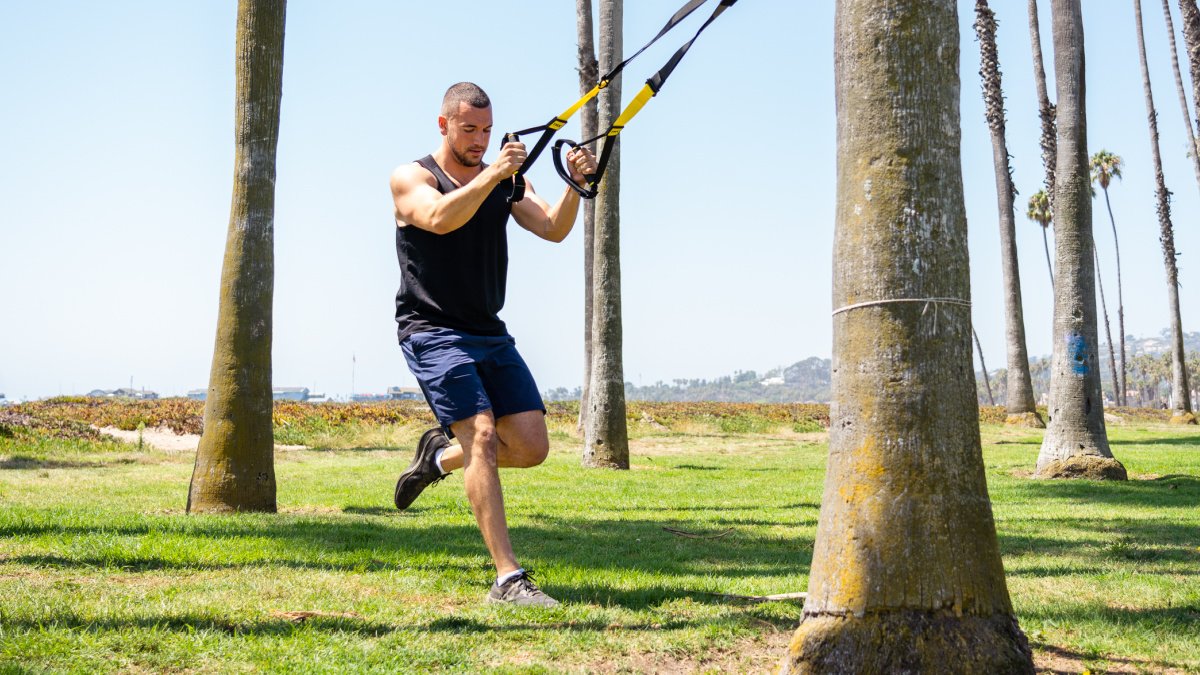
For the past seven months, Todd Durkin, C.S.C.S., author of The IMPACT! Body Plan, has challenged you to a fitness test every weekend. But this time, he also challenged Pro Bowl quarterback Drew Brees and former Navy Seal Randy Hetrick to try this fearsome four-move circuit that combines grueling upper-body strength moves with lung-busting cardio."It smoked me," said Hetrick, dripping with sweat after he finished the challenge. That's because the circuit includes exercises performed with a TRX training system. Created by Hetrick himself while on the road during one deployment, TRX uses suspension body-weight moves to boost your biceps, blast your triceps, and pump up your entire upper body. Plus, the instability of the TRX forces your core to work harder, increasing the difficulty of the exercises.If that doesn't sound hard enough, Durkin also added single-arm kettlebell swings and a sprint to the mix to test your cardiovascular fitness and torch your gut.Here's how to do it: Grab a stopwatch and time yourself completing the following four exercises in a row.Single-Arm Kettlebell SwingGrab a kettlebell with one hand and assume a shortstop position (quarter squat, hips pushed back, spine in alignment), letting the bell hang in front of you. Swing it between your legs and behind your hips. Now stand and swing it up to eye level while extending your hips and contracting your glutes. Drop back to the starting position; let gravity bring the kettlebell back between your legs. Complete 15 reps with one arm, and then hold the weight with your other hand for 15 reps.TRX Atomic PushupAttach TRX suspension training straps to a secure object. Then place your feet in the straps and assume a pushup position with your hands just wider than shoulder-width apart. Your body should form a straight line from your ankles to your head. Now do a pushup, by bending your elbows and lower your body until your chest nearly touches the floor. Press back up, and without rounding your lower back, pull your knees toward your chest. Reverse the movement back to the starting position. That’s one rep. Do 20.TRX Arm SplitsSecure the TRX to a secure object so the handles hang at waist height when standing. Face the TRX and hold the handles with palms facing down. With your feet hip-width apart, lean back until your arms are fully extended. This is the starting position. Next, pull your body forward toward the anchor point by simultaneously bringing your right arm above your right shoulder and your left hand down by your left leg. Then return to the starting position. That's 1 rep. Do 10 total.30-Second RunHop on a treadmill and run for 30 seconds. Hetrick and Brees ran at a speed of 8.5 mph.Can you keep up with the Pro Bowl quarterback and former Navy Seal? Watch the video above to see Drew Brees and Randy Hetrick complete this weekend's challenge. Brees completed the circuit in 5 minutes and 15 seconds, while Hetrick performed the moves in 5 minutes and 58 seconds.
Want more from Durkin? Get the TRX Performance: Train Like the Pros workout.
The Principle of Individuality
Transformation Blog Series, Part 6 of 7
“TRX allows you to be “all in” physically and emotionally because you can use it anywhere, anytime for any fitness goal. You are on your own journey, embrace your positive results, take every opportunity you can to celebrate your body’s movement and keep your eyes on your next small victory.”
As mentioned in our introductory blog about how to successfully achieve a body transformation, with the exception of identical twins, no two people have the same genetic characteristics and therefore will not respond to movement, diet and changes in their lifestyle at the same pace or with similar results. Such individual variation between people explains why some individuals show such great improvements after participation in a given program (high responders), whereas other people experience little change after following the same program (low responders). However, don’t allow the fact that you may be a low responder discourage you from ever making changes in your life. The good news is that even small changes can yield big body transforming results. The key is to identify your strengths and weaknesses, set some specific, realistic goals that are measurable and time-based, and then get “all in” with your training plan.
Here’s how to do just that:
Setting Realistic Goals
Any program you embark upon must take into account your individual differences, specific needs and performance abilities. Therefore, you must have realistic goals about your training and make selections that will lend themselves to you meeting these individual needs. One of the obstacles that tend to lead people away from a healthy relationship with exercise is the selection of exercises that aren’t fun, engaging or motivating. Maybe you’re trying to exercise early in the morning, when you are better in the evening. Maybe you’re selecting exercise programs that don’t achieve what you want from your training. Consider the following and see what might be standing in the way of fitting movement into your life:
What time of day are you most successful at sticking with exercise?
What do you like to do?
Do you enjoy workouts in a group or doing it alone?
What are your three favorite body parts and what three would you like to see change?
“It’s how you respond to these challenges that is the deciding factor in whether you achieve your larger goals.”
Once you are able to identify exactly what may be an obstacle, and what you want from your training program, work to figure out how to make positive results happen. Be sure to give yourself credit for even the small steps you take that result in even little changes. Your commitment to your goal of transformation is to be commended and you should always give yourself grace, honor and gratitude for what you are doing to make changes.
Setting Specific Goals
Because training adaptations are specific to the type of training you are performing and to the volume and intensity of the exercises selected, the program you are using must stress the physiological systems that are critical for optimal performance in the given area that you are trying to change. For example, if you desire more strength, you must perform movement in volumes and at intensities that will cause muscular overload, stimulate the need for the muscles to become plastic, meaning they will grow (hypertrophy) as well as adapt to the neural changes associated with improved strength. If you want to improve strength and power, you need to train for strength and power. If you want to lose fat and increase your lean mass, you must train with a metabolic goal in mind. Don’t expect a better cardiorespiratory system if you are training for more strength and neglecting the aerobic component.
The following table is based on the American College of Sports Medicine (ACSM) Guidelines for Increased Strength 1. If strength is a goal for you, this table can guide you in selecting the reps, sets and loads you can apply to your TRX program to achieve strength training goals, with enough flexibility to ensure that your individual needs can be met.
You will notice that the “load” column refers to a prescribed percentage of your 1RM (one repetition maximum). When using your body mass as resistance on the TRX® Suspension Trainer™ the most effective way to manage load is to follow the repetition recommendations in the “volume” column. For example, when training for strength development use a body angle that requires you to reach muscle fatigue in the recommended repetition ranges. Remember to always focus on strict movement standards and do not sacrifice quality for quantity. For more advanced strength athletes using a weight vest is an excellent way to increase intensity once you have maximized body angle.
Get All In
As a 30-year veteran fitness trainer, I have seen many people get really excited about starting a training program, only to find that life gets in the way and interferes with their dedication to their new program. The biggest obstacle for most people is time, or a lack thereof. Being really excited for the first few workouts is expected, but once you miss one, you tend to miss another one and then another. Pretty soon you’ve stopped exercising altogether and you’re “all out.” This feeling of guilt tears at us emotionally and can really decrease motivation, making us feel that we have let ourselves down.
“Remember, success is often measured in millimeters, small victories that deserve to be celebrated and that generate positive momentum towards your larger goals.”
Although the small defeats in trying to make a body transformation are not easy, they are likely going to happen at one point or another. It’s how you respond to these challenges that is the deciding factor in whether you achieve your larger goals. This is one of the major reasons why the TRX Suspension Trainer is one of the best tools for achieving a total body transformation. The flexibility it provides makes it a perfect tool for time-crunched individuals looking for that total body transformation because it can deliver quick, efficient workouts that can be fit into your schedule anywhere, anytime. TRX lets you perform exercises anywhere at any time because it is portable, flexible and customizable. Movement selection can be customized to meet your level, skills and abilities exactly, quickly and efficiently.
Remember, success is often measured in millimeters, small victories that deserve to be celebrated and that generate positive momentum towards your larger goals. 2 more reps, 3% less body fat, 1 millimeter less on your waist, etc. Look for your small victories and avoid allowing a missed workout. You’re running your own race, so someone else’s should not discourage your effort. Your body is unique and responds to exercise thusly. TRX allows you to be “all in” physically and emotionally because you can use it anywhere, anytime for any fitness goal. You are on your own journey, embrace your positive results, take every opportunity you can to celebrate your body’s movement and keep your eyes on your next small victory.
References:
1. Esso, M. 2013. Resistance Training for Health and Fitness. AMerican College of Sports Medicine.
Irene Lewis-McCormick M.S is Adjunct Faculty at Drake University, an SCW Fitness Education (SCW) Certification Master Trainer and the Education Director at Octane Fitness. An Orange Theory Fitness coach, she’s a twice published author (Human Kinetics) holding advisory board positions with Diabetic Living and the National Egg Council. Named Top 3 Group Fitness Instructor 2015 by IDEA Health & Fitness, Irene is a RYKA Ambassador and Subject Matter Expert for ACE. Irene presents education for SCW, ACSM, IDEA and NSCA. She is an SCW, TRX, Tabata Bootcamp, Barre Above, JumpSport and Octane Fitness master trainer. Certifications include SCW, ACSM, NSCA, ACE, AFAA & AEA.
Body Transformation Series, Part 1 of 7 Body Transformation Series, Part 2 of 7
Body Transformation Series, Part 3 of 7
Body Transformation Series, Part 4 of 7
Body Transformation Series, Part 5 of 7
Body Transformation Series, Part 6 of 7
Body Transformation Series, Part 7 of 7
The New TRX BANDIT™: Why Every Resistance Band Workout Needs It
We’ve seen it all before—resistance band workouts (not to be confused with our Suspension Trainer™ workouts). Aka, those long stretchy exercise bands. Some are large circular loops. Some are straight flat elastic. And many have built-in handles. There are tons of options and they’re great for all-around training—and even sports rehabilitation or physical therapy—but the ones with handles are usually cumbersome and limited in use, while the non-handle resistance bands aren’t as effective as they could be because they—shocker—hurt the hands so much from the plastic digging into your palms.
We created Strength Bands to offer folks a super effective, premium quality resistance band to level up anyone’s fitness from 5-150lbs. However, we’re always thinking beyond the status quo, so we asked ourselves—beyond making a superior product, how do we make resistance band training easier and more effective?
THE PROBLEM: RESISTANCE TRAINING COULD BE BETTER
Let’s go over a few things we love about Strength Band training and a few things we don’t love as much:
WHAT WE LOVE
Super portable (like having a whole weight rack, sans the weight)
More time under tension means your muscles are constantly working
Super versatile—use light bands for physical therapy or muscle activation/warmups; use long bands for sprinter drills, looping it around your waist; use heavy bands for full-body moves like back squats
An overall really awesome way to strength train
WHAT WE DON’T LOVE
Holding the band is super uncomfortable—the plastic pinches and digs into your palms, especially with heavier resistance, making it really difficult to load up with more weight
When you can’t load up with more weight, it’s harder to get the most out of your workout moves
It’s challenging to get your hand in the right position
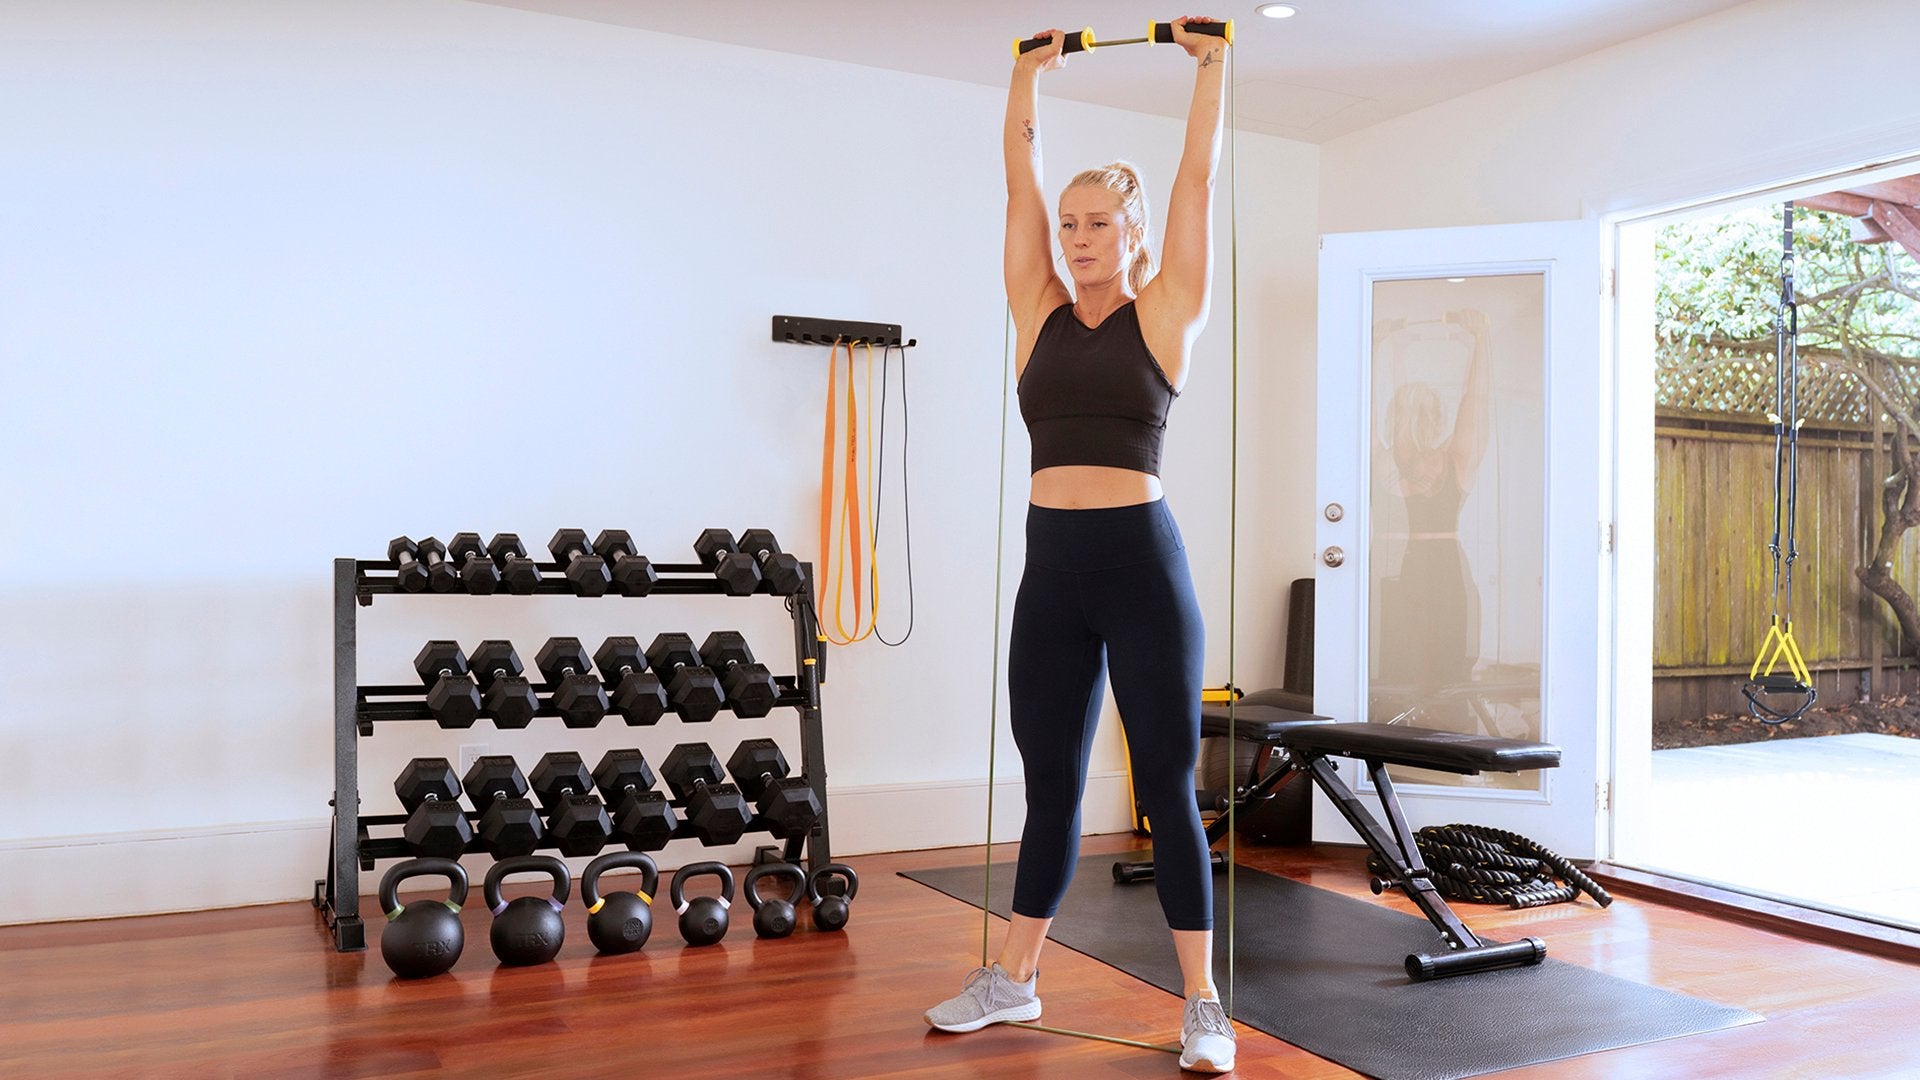
THE SOLUTION: TRX® BANDIT HANDLE
Always the innovator, TRX® founder Randy Hetrick first came up with the idea for a resistance band removable handle that was 1) super familiar and recognizable in design, 2) super comfortable, and 3) arguably the most important—easy to put on and take off (and of course, have it be intuitive to do so). The end result is our all-new product, the TRX BANDIT™
HOW IT’LL REINVENT THE WAY YOU TRAIN
Here’s what makes the TRX BANDIT™ a must-have in your training kit:
Adding a handle opens up a plethora of moves and weights you couldn't achieve before
Better comfort, control, and performance
More strength, endurance, and mobility moves
Instantly recognizable handle design—no strange or clunky designs here
Lightweight and small enough to fit in a backpack (or purse) with your Strength Bands
Durable materials you can count on
Textured rubber coating so your grip won’t slip
Simple lengthwise gap lets you easily snap on a Strength Band or two
Once the Strength Band rests inside the handle, it stays put
To use it, just make sure the gap faces opposite whichever way you’re using the band
Oh and FYI—we have TRX Bandit-specific workouts and getting-started vids on our all-new TRX Training Club℠ app. Signing up is the easiest way to work out with your new Bandit handles.
BACK IT UP–WHAT IS RESISTANCE TRAINING, ANYWAY?
There are so many terms out there in the fitness world, sometimes it’s hard to keep up. Here’s a quick little breakdown for you:
RESISTANCE TRAINING
Resistance training is the overarching term that strength training and weight training fall under. At its simplest, it’s just using your bodyweight. It can also be training with a resistance band, free weights or anything where you’re pushing or pulling against something with added resistance.
STRENGTH TRAINING
Strength training is resistance training with a specific goal in mind—strength. It can be done through free weights like dumbbells and barbells or weight machines or even resistance bands, all with the specific plan of building muscle or mass.
WEIGHT TRAINING
This is resistance training that uses free weights or weight machines to improve general health and fitness without any clear-cut goal or plans.
Bottom line is—a resistance band (or in our case, a Strength Band) is a GREAT way to do both general resistance training and strength training. One of the best parts of resistance band training in particular is that, unlike traditional weights, it provides resistance throughout the entire course of a move. Translation: it never gets easier. For all the training geeks out there, it’s a super effective way to get more “time under tension,” which leads to greater strength gains faster.
LET’S NOT FORGET THE MANY HEALTH BENEFITS
Physical and mental health benefits that can be achieved through resistance training include:
Improved muscle strength and tone
Maintaining flexibility and balance
Weight management and increased muscle-to-fat ratio
May help reduce or prevent cognitive decline in older people
Greater stamina
Help with chronic conditions like arthritis and heart health
Pain management
Improved mobility and balance
Improved posture
Decreased risk of injury
Increased bone density and strength
Reduced risk of osteoporosis
Improved sense of wellbeing (like self-confidence, body image, and mood)
Improved sleep
Increased self-esteem
OH, AND DON’T FORGET...
Once you’re up and running, make sure you sign up for TRX Training Club℠ so you can drop into LIVE classes 7 days a week and take your favorite On-Demand workouts anytime, anywhere. Don’t forget to grab our all-in-one training method that makes fitness achievable for anyone, anywhere—our TRX® Suspension Trainer. All the anchor options to set it up right here.
The Importance of Core Strength in Golf
Golf has become a game of high technology equipment. One often overlooked key piece of equipment is the golfer’s body. Is it stable and strong where it needs to be? Is it mobile and flexible where it has to be?
A golfer will always perform better and reduce the risk of injury when properly conditioned. How effecient is your golf training workout?
The drive is one of the most intricate skills in all of sports. A powerful swing places a lot of force on the knees, hips, back, shoulders, elbows and wrists. The lower back is often the site of acute and chronic pain for recreational golfers and can be a career ender for professional tour players. One way to both improve performance and reduce the risk of injury is "core" training. Looking to enhance your golf game while protecting your back? Take our quick assessment quiz to get a personalized core training program designed specifically for golfers at your skill and fitness level. The easiest way to think of your core is your body minus your arms and legs. From your hips to your shoulders, that's your core, your power center and your key to performance and longevity.
TAKE OUR TRAINING QUIZ
Golf is obviously a game that depends on rotation of the body to deliver power from the ground through the core to the club and finally the ball. Most golfers find it surprising that the lower back, or lumbar spine, is not designed for a lot of rotation. However, you continue to see golf exercises that target flexibility and range of motion in the lower spine. The more effective training strategy is to build stability in the lower spine while working to optimize mobility and power in the hips and upper, or thoracic, spine.
Low back pain and injury are often a result of movement restrictions in the upper spine and hips. Once movement is limited in these regions, the lower spine is forced to produce rotation in the golf swing. The result is at best reduced distance, accuracy and consistency in shots and at worst, injury. A more effective approach is to train stability in the lumbar spine and mobility in the hips and upper spine.
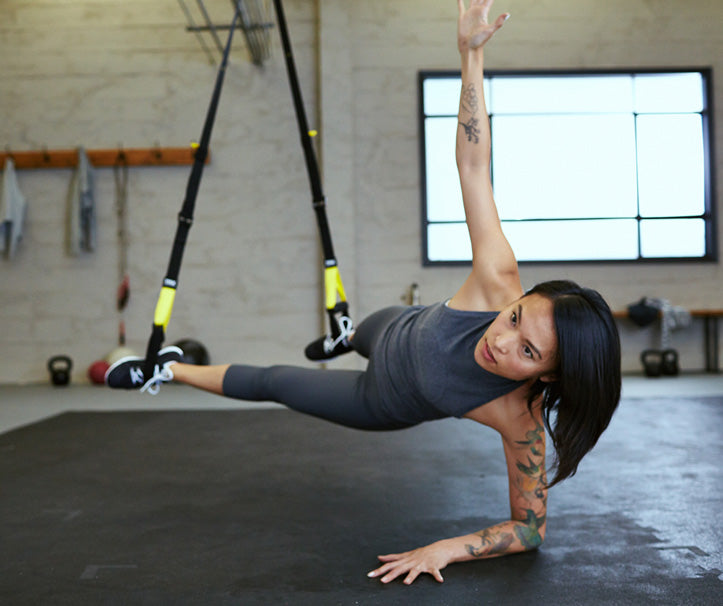
Core strength for golf can be effectively trained from a standing position with exercises that promote lower back stability with hip and upper back mobility. Suspension training is uniquely suited to deliver these qualities. Movements such as the TRX Golf Rotation exploits reflexive core engagement for lower spine stability allowing proper hip and upper spine movements required for golf. The TRX Balance Lunge and the TRX Lunge both integrate single leg balance and stability with core engagement. The TRX Plank and TRX Side Plank variations train core stability and body alignment.
The TRX has become an essential exercise tool for the cutting edge golf performance and injury prevention for coaches, trainers and athletes at all levels. The benefits in flexibility, strength and power are seen almost immediately. Core conditioning is vital for golf, and suspension training is vital for fast and effective core performance.
As the TRX Head of Human Performance, Chris Frankel draws from over 25 years of experience as a strength and conditioning coach. He earned his doctorate in Exercise Science from the University of New Mexico. Before TRX, Chris was an instructor in the Department of Health, Exercise and Sport Sciences at the University of New Mexico.
The Importance of Consistency and Sticking with It
Body Transformation Series, Part 3 of 7
“Changing behavior to include exercise requires more effort than simply opening a bottle and swallowing a few pills. Physical activity is the only medicine that offers many benefits, with no negative side effects.”
Our ancestors were constantly on the move, but in the last century, technology and the build–up of our communities has brought numerous innovations, including the ability to conserve our personal energy and replace it with external power, all conspiring to limit our daily need for physical movement. Less than 10% of Americans meet fitness guidelines, which includes 60-minutes of daily activity, at least 2500 kcal a week. More than 60% of Americans burn less than 1000 calories a week, not meeting the recommended daily physical activity guidelines for health, a mere 30-minutes of moderate-intensity physical activity most days of the week. And of that group, fewer than 20% do so in a way that will bring about improvements in physical fitness. Many sedentary behaviors are now considered to be the norm – a trend that is not helping us start and stick with an exercise program!
The American College of Sports Medicine promotes a campaign called “Exercise is Medicine,” and the evidence is on their side. But changing behavior to include exercise requires more effort than simply opening a bottle and swallowing a few pills. Physical activity is the only medicine that offers many benefits, with no negative side effects. Even though most of us KNOW that physical activity is important for health; that we feel better and are more productive if we start and keep exercising, few are able to escape their environment and self-image to start the regenerative process that daily exercise brings. So what is standing in your way?
Sallis and Hovell (1990) studied the most common reasons that adults offer for not adopting more physically active lifestyles.
•
Not enough time
•
Inconvenient
•
Lack self-motivation
•
Not enjoyable
•
Boring
•
Lack confidence in ability
•
Fear of being injured, or have been injured
•
Lack self-management skills such a goal setting, progress monitoring, or a reward process
•
Lack of encouragement, support or companionship
•
Do not have safe and convenient park, sidewalks, trails or paths
Go BIG With Change
To help you initiate and maintain involvement in enjoyable physical activity, remember that you are in control of your choices. Although small changes can be very effective for some people in making moderate adjustments to physical activity levels and other health behaviors, other research suggests you should “go big.” Moderate changes are hard to monitor and easy to ignore, making a slip back into bad habits more likely. However, big changes in health and exercise behaviors are more likely to yield big results. Set a lofty goal, such as running a marathon, completing a 90-day exercise plan or making significant changes in diet and body weight. Make a major commitment to yourself and see what happens!
Exercise is Perishable
Researchers have found that a primary reason people continue to exercise day after day is due to the positive feelings associated with the exertion of exercise. People feel healthier, more physically masterful and more in control of their life when they exercise regularly. Staying on a tight schedule matters because skipping days interferes with motivation and eventually, the health benefits of exercise. At first, skipping just decreases your inspiration. But soon after missing a few days, your endurance is negatively affected. The metabolic benefits of increased caloric expenditure, joint range of motion and other physiological components begin to wane. We start to feel stiff and rigid. Our bodies are designed to move and every movement matters!
“Be persistent and above all, patient with exercise. Only with loyalty and commitment will you be able to sustain the effort over a prolonged period and reach your health and fitness goals.”
Try not to miss more than 2-days in a row if you can help it. Research has demonstrated that although time off can be great for recovery between exercise sessions, more than 2-days off in a row can increase your risk of injury when you return to a more consistent schedule, particularly if the exercise you are performing requires a well-practiced technique.
Why Do You Do It?
Is it to look and feel good, for weight control or to maintain or improve your health? Fitness programs that foster a sense of achievement and satisfaction are more likely to encourage adherence. When we participate in activities that are personally meaningful, make us feel good or help us reach personal goals, the pleasure of participating is enhanced. Even so, not all healthy pleasures are immediately gratifying. You must be willing and able to delay gratification if you are to experience the pleasure and benefits of regular physical activity. Be persistent and above all, patient with exercise. Only with loyalty and commitment will you be able to sustain the effort over a prolonged period and reach your health and fitness goals.
The TRX Suspension trainer makes it EASY to work a consistent routine into your daily schedule because of its portability and ease of use. Challenging and effective programs that improve flexibility, strength, endurance and power can be developed and enhanced using the TRX Suspension Trainer. With so many safe, effective exercise options, there is no excuse not to use it every day in every workout.
Irene Lewis-McCormick M.S is Adjunct Faculty at Drake University, an SCW Fitness Education (SCW) Certification Master Trainer and the Education Director at Octane Fitness. An Orange Theory Fitness coach, she’s a twice published author (Human Kinetics) holding advisory board positions with Diabetic Living and the National Egg Council. Named Top 3 Group Fitness Instructor 2015 by IDEA Health & Fitness, Irene is a RYKA Ambassador and Subject Matter Expert for ACE. Irene presents education for SCW, ACSM, IDEA and NSCA. She is an SCW, TRX, Tabata Bootcamp, Barre Above, JumpSport and Octane Fitness master trainer. Certifications include SCW, ACSM, NSCA, ACE, AFAA & AEA.
Body Transformation Series, Part 1 of 7
Body Transformation Series, Part 2 of 7
Body Transformation Series, Part 3 of 7
Body Transformation Series, Part 4 of 7
Body Transformation Series, Part 5 of 7
Body Transformation Series, Part 6 of 7
Body Transformation Series, Part 7 of 7

The Home Gym That Costs Less Than Your Annual Gym Membership
According to the International Health, Racquet & Sportsclub Association, the average person spends $54 per month on a gym membership. In urban centers like New York, Chicago, DC, and San Francisco, that number might be as high as ten percent of a person’s monthly income. But fitness doesn’t have to cost a fortune. It’s easy to create a home gym you can use for years for less than the cost of your annual gym dues.
Using the lower figure, $648, for annual gym dues, we’ve pulled together ten items you can buy to build out a full-body workout experience in your home.
The first item on the list? The TRX Suspension Trainer. This is your head-to-toe solution for home workouts. Because the Suspension Trainer uses your bodyweight as your “load” for exercise, it’s easily adaptable for every fitness level. There are no plates to change, no pins, and no guesswork: just take a step forward or back to change the difficulty of your exercise.
The TRX Home2 System comes with both the Suspension Trainer and a workout app with dozens of programmed workouts from work class coaches, so you get equipment and expert training for under $200.
TRX Home2 System: $199.95
Remaining budget: $448.05
If you have hard floors in your home, a mat will go a long way to making your workout more comfortable. While not completely necessary—some people just use a towel—it can soften the impact of barefoot jumping exercises, and protect your knee caps and spine from pressure from your floor. If you’re going to be doing bodyweight core work like bicycle crunches or forearm planks, do yourself a favor and spend the money.
Mat: $24.95
Remaining budget: $423.10
So you like Pilates, but you don’t want to spend a lot of money on Pilates classes. Get a set of gliding discs, also known as sliders. These are frequently used for core exercises, but they’re also good for glute and adductor work. Gliding discs usually cost about $8-$15, depending on the manufacturer. Look for a set that works on both carpet and hard surfaces.
Gliding Discs: $9.08
Remaining budget: $414.02
You don’t have to pump iron in the traditional sense—with dumbbells and barbells—to incorporate weight into your workout: just buy a kettlebell. Much like the TRX Suspension Trainer, a kettlebell is a limitless tools. Search for kettlebell exercises, and you’ll find hundreds of terms like Turkish get-up, snatch, swing, twist, and farmer carry. You can even download workouts!
If you’re new to strength training, start with a light kettlebell, around 12 or 15 pounds, and remember that kettlebell pricing increases with weight. For this article, we chose an 8 kg kettlebell, (a little over 17 lbs) as a starting point.
Kettlebell: $44.95
Remaining budget: $369.07
Kettlebells are fantastic for swing and press workouts, but if you want to toss weight, you'll need a medicine ball or wall ball. (A medicine ball is usually slighter smaller and lighter than a wall ball.) You can use a weighted ball for wall ball tosses, ball slams, torso twists, weighted squats and lunges, sit-ups with shoulder presses, and more. Weighted balls also work well into partner exercises.
Like kettlebells, medicine balls and wall balls are priced according to their weight. Consider starting with one that’s slightly lighter than your kettlebell. For this article, we chose a 14-pound wall ball.
Wall ball: $99.95
Remaining budget: $269.12
Before you can add weight to a bicep curl or chest press, you need to buy weights. But you don’t need to replicate the weight rack from the local gym in your home. Start with a set of adjustable dumbbells that allow you to load and unload plates according to your fitness level. In addition to bicep curls and chest presses, you can use your dumbbells with squats, tricep extensions, squats, and lunges.
For this article, we based the price on a 40-lb adjustable dumbbell set.
Dumbbells: $47.75
Remaining budget: $221.37
If you decide to invest in dumbbells—or you already have a set at home—a stability ball can stand in for a weight bench to support your upper body while you do chest presses. It’s also a handy tool on its own. Use it for core-toning exercises like bridges, pikes, and planks, or for stretching and mobility work.
Stability ball: $34.95
Remaining budget: $186.42
Have a hallway, garage, or basement with room for a serious cardio-blast? You need a battle rope. From heart-pumping and core-engaging slams, waves, jacks, throws and pulls, a battle rope will work your entire body. There are dozens of battle rope exercise plans online, so you’ll enjoy lots of variety.
Battle rope: $129.95
Remaining budget: $56.47
Adductors—those muscles through the side of your legs—are frequently overlooked, but mini-resistance bands will ensure they get the attention they deserve. These small, stretchy bands safely increase the intensity of an exercise without the need for extra weights. They’re effective, and really inexpensive.
Mini band set: $14.95
Remaining budget: $41.52
Strength bands are another way to shake up your workout. Larger and heavier than the mini-bands, you can use them for anything from rehabilitation, stretching, mobility and resistance training, to power-lifting, weightlifting and pull-up assistance. For this article, we based pricing on a medium strength band.
Strength band: $34.95
Remaining budget: $6.57
Altogether, that's ten fitness tools for your home gym—and thousands of exercise options—for less than an annual gym membership. If you're tired of driving to fitness clubs and waiting for weights and equipment, consider bringing the gym home.
Part 4: The Evolution of the TRX Foundational Movements – Plank to Crawl
Over the last few months, we’ve done a deep dive into what we term The Evolution of our TRX Foundational Movements (Plank, Pull, Hinge, Push, Lunge, Squat, and Rotate). Because “evolving” is an essential component to all movement goals, we felt that it was high-time that we provide all of you with an expansion on our standard movement vocabulary. The goal is to give you additional options for safely challenging your clients and students in their training.
If you’ve followed along—and we hope you have—you’ve already learned about the three new additions to the TRX Foundational Movements pyramid: Hinge to Bend (Part 1), which was followed by the Rotate to Twist (Part 2), and then the Lunge to Step (Part 3). If you are just now diving in, we recommend you go back and read the previous blogs in this series.
We conclude this series with the foundation of all movements, the all-powerful PLANK, and its progression to CRAWL. Want to find the perfect plank variation for your core strength level? Take our quick assessment quiz for personalized recommendations to help you master these fundamental moves.
TAKE OUR TRAINING QUIZ
PLANK 101
While typically seen as a static quadrupedal exercise—meaning that it’s performed on all fours (hands and toes or elbows and toes, for example)—the plank translates to all other exercises. From a squat to a low-row to a lunge, we emphasize an "active plank" to maintain proper levels of stiffness around the spine—“body like a surfboard”, a TRX Swing Thought we like to use to provide visual imagery to correct alignment of the body— ultimately improving strength and endurance in core muscles, which protects the spine and helps transfer forces through the body. Just like a house needs a strong, stable, intact foundation, the human movement system needs a stable foundation in order to move well and to avoid injury. The ability to create the proper level of stiffness in joints is important for everyone, from the newbie on day one to the 10-year vet on day 1,000. All in all, the active plank helps us achieve awareness of levels of stiffness and stability.
By now you know that this series has been all about changing the condition and so you can probably guess that we’re going to give the plank a bit of a shakeup by way of the crawl. In this final installment, we focus on this progression and mark it as the 11th movement in the TRX Foundational Movement pyramid, branching off as an evolution of skills and qualities acquired practicing the plank.
CRAWLING CONSIDERED
As a caveat, before we get into the nitty gritty of the crawl, it’s important to remember that not all movements are right for all people. Wrist, shoulder, or knee issues will likely warrant its proper introduction, or in some extreme cases, exclusion from a client’s program. It’s all about FLAC, which you learned about if you’ve gone through any of our TRX education courses. FLAC stands for FOCUS on the movement, LEARN the appropriate level of progression, APPLY the training load, and then CHALLENGE your limits. As a top-notch coach, you know that progression is earned and, in this case, you really must learn to plank before you can crawl.
Caveat done!
LET’S GET CRAWLING!
Some of you may be asking: “But wait, when I crawl I can’t maintain my strict, stiff, active plank!” Yes, that’s true. When we are moving on all fours, the pelvis, spine, and shoulder girdle will necessarily demonstrate supple motion, like you see in other animals walking on all fours. You learned the active plank to remind you, or reprogram your movement software, to create local stiffness around your axial skeleton. Crawling encourages dynamic stabilization, appropriate segmental movement of the spine, proper glenohumeral and lumbopelvic rhythm to use what Gracovetsky termed “the spinal engine” in the late 1980’s. This is one reason why we consider crawling as an evolution of active planking.
WHY CRAWL?
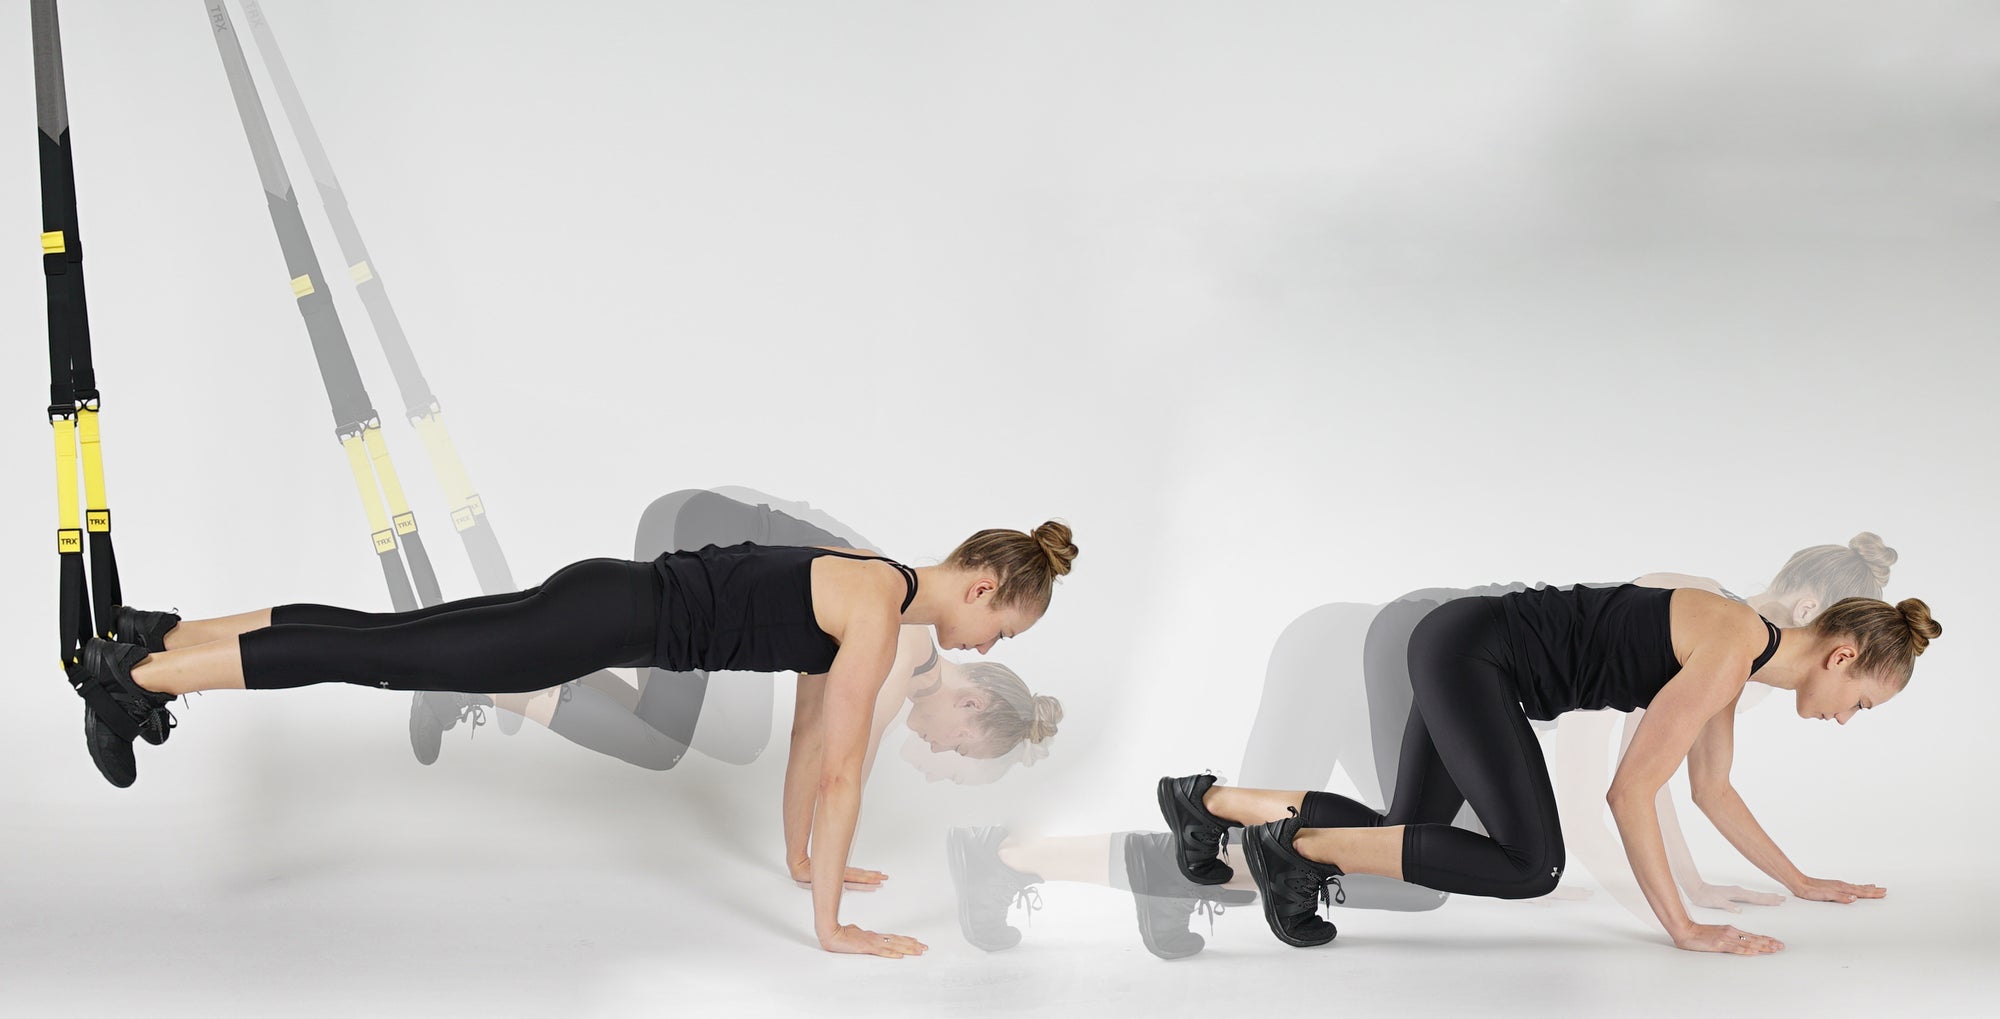
The crawl is essentially a moving plank that is typically performed on the hands and toes/balls of feet. It’s a full-body coordinated movement that, when performed properly, trains mobility, stability, and even conditioning all at once. It functionally strengthens the core and improves upper and lower body coordination since your shoulders and hips must work together in a coordinated and reflexive way.
The crawl also features primal movement patterns, but because most of our daily lives have removed us from our early grounding exploration and playing, it also requires significant cognitive attention to be acquired, practiced, and performed well. This practice can lead to improved proprioception, aka your perception of where torso and limbs you are in space. As you improve your mobility you create better information input (or afferent pathways to your nervous system). The more afferent information your nervous system has related to joint positions, weight bearing, pressure, and force distribution the better outgoing, or efferent, movement options can be performed. Because crawling involves your feet, toes, hands, and fingers, all which are full of sensory receptors, we refer to this as a proprioceptively rich environment. The more you can improve or maintain proprioception the better you will be at recognizing and adapting to your environment and moving efficiently. Effective human movement is a nuanced interplay of appropriate levels of stiffness, suppleness, contractions, and graduated relaxations timed just right. Bottom line is, crawling can enhance your ability to hone some of these nuanced qualities.
MYRIAD TRAINING OPTIONS
Like most exercises, the crawl can be regressed and progressed based on the needs of your client or student. Bodyweight is not only a great place to start, but can provide more than enough opportunity for modifications - ie. baby crawl, bear crawl, crab walk, gorilla scoot, lateral and reverse variations. You might challenge your higher-level athletes to move quickly in various directions, such as dragging a TRX Power Bag as they crawl, or adding load such as a weighted vest. Inexperienced crawlers might start on hands and knees, six-point crawling (as opposed to toes) with slow forward movements—or a simple back-and-forth pattern without changing limb placement—to work on carefully interacting with the ground and avoiding excess side-to-side weight shift.
The crawl isn’t just child’s play. It really is an all-in-one exercise that offers a multitude of opportunities to enhance physical function, create a more diverse and interesting training program, build a better mind-body connection, and so much more.
THAT’S A WRAP!
And there you have it! You’ve successfully completed our four-part series on the Evolution of the TRX Foundational Movements.
In Part 1, hinge progressed to the bend, expanding our exercise library in the mind body space (yoga, pilates). In Part 2, we added dissociation of the upper and lower body as we evolved from rotate to twist. And in Part 3, we discussed the lunge, which is a deceleration tool, led to the acceleration-based step. And we finished off by adding locomotion to the plank with the crawl.
FINAL THOUGHTS
We know that this is a lot of information to absorb and so we recommend taking your time to study and practice each of the four new movements before introducing them into your client sessions or classes. Once your athletes demonstrate lunge mastery, it might be time to test out the step. Can they maintain a surfboard body while planking? If so, then change the challenge and get them crawling. You can then further enhance each movement by “changing the conditions” with our functional training tools. Doing so will help you create and integrate some additionally challenges.
We hope you’ve enjoyed taking this journey with us. Please keep in touch and let us know how these movements have impacted you and your clients. And, of course, we look forward to seeing you at one of our upcoming educational courses soon!
![Part 3:The Evolution of the TRX Foundational Movements [Lunge to Step]](http://www.trxtraining.com/cdn/shop/articles/claudia-step-edit_960x.jpg?v=1644298488)
Part 3:The Evolution of the TRX Foundational Movements [Lunge to Step]
The TRX Foundational Movements were created to provide a baseline of knowledge for understanding and teaching movement patterns that are fundamental to both athletic training and to everyday life. Each one—from the plank to push to the pull to the squat, etc—create the base for the hundreds of movements we utilize in any given environment, using any number of training tools (again, these movements map to almost everything we do). We teach these concepts in depth in our TRX education courses in order to enable you to properly and effectively coach any person (regardless of their skills) using any modality.
TRX’s movement-based coaching philosophy focuses largely on seven Foundational Movements (Plank, Push, Pull, Hinge, Lunge, Squat and Rotate), understanding that they can and will be expanded on as one progresses. In this blog series, we flip our traditional script a bit and discuss the evolution of these movements. If you haven’t had a chance to read the two previous blogs in the series: Part 1, Hinge to Bend and Part 2, Twist to Rotate, we highly suggest you do before diving into Part 3.
If you’re all caught up, then let’s get into the next installment: Lunge to Step - step being the “new” movement we’ll be introducing.
ABOUT THE LUNGE
In the gym, the lunge is a popular unilateral movement, providing an excellent way to recognize imbalances in strength and/or mobility. The lunge is a versatile exercise that has infinite variations and can be performed in all ranges of motion to target the musculature in different ways. For instance, lunges provide the foundation for walking, running, sprinting, climbing, and most bipedal locomotion. When you improve the way you lunge, you can improve your efficiency in any activity that involves lower body acceleration and deceleration.... Powerful stuff. When lunging, focus on maintaining stability from the ground, through the core, up through the top of the head, to enable mobility in the ankles, knees, and hips. Seems simple enough...
In the TRX Education Journey, we discuss the lunge in our TRX Suspension Training Course (setting the standards on and off the TRX Suspension Trainer), our Functional Training Course (where we expand the coaching to multiple functional training tools), and then again in the TRX Group Training Course (where you learn to coach the standards of this movement in a group environment).
THE STEP VS THE LUNGE
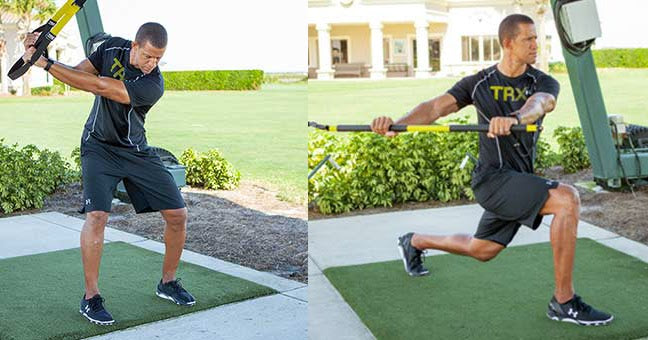
While we discuss the lunge throughout our TRX Education Courses, its counterpart: the step, is a great addition to add to your knowledge base as a coach. The primary reason we teach the lunge first is to ensure we train our clients or athletes how to decelerate (ability to slow movement down as the body lowers to the ground) before we move into acceleration exercises, which is where the Step comes in. While the lunge is used to promote deceleration, the step is the agent for acceleration, driving through the ground and into hip, knee, ankle, and metatarsal extension. In the world of TRX Suspension Training, a good example of the step is the TRX Sprinter Start, where you start from a strong standing plank position, and through the addition of a hip extension, then driving through the ball of the foot, squeeze the glutes ,and extend forward to create acceleration.
Although the step can be taught as a “progression” to a lunge, it can also be used as a great unilateral exercise entry point for those who struggle with knee pain during lunges.
STEP MECHANICS
Step mechanics should mirror squat-to-stand mechanics in that one of the primary cues for both is to drive through the ground as the body extends. To break this down, as you stand, the shin should remain parallel to the trunk; the goal of the step is to create the appropriate amount of range of motion with load distributed through the torso. If we go back to what we learned in our TRX Education Courses, the movement standard for the step is defined by what should be stable and what should be mobile -the spine should be stable and the hips, knees, ankles, and metatarsal heads should be mobile. To bring in even more TRX terminology, an applicable TRX Swing Thought (our imagery based cueing system to help your clients better understand and correct their faults) in the case of the step would be “body like a surfboard”, as we want them creating an active plank with a tall torso throughout the movement.
HOT TIP: EARN YOUR PROGRESSION
Stepping exercises should be introduced without any external load. Load can be added when the client is able to perform with optimal mechanics. For instance, keep your eye out for minimal—if any—wobbling. When the client has earned their progression, and adding load is appropriate, you can change the condition by adding dumbbells or kettlebells, and/or by adjusting the tempo. But keep in mind, it’s important to change only one condition at a time as to minimize risk and maximize client confidence and proficiency.
SAMPLE “STEP” EXERCISES TO INTEGRATE INTO YOUR WORKOUTS:
TRX Sprinter Start:
TRX Hamstring Runner:
Some additional exercises to try are Box Step-ups and/or Sled exercises.
FINAL NOTES:
When all is said and done, training programs should be tailored to meet the needs of the individual - and every progression must be earned. As the old saying goes, “learn to walk before you run.” The same goes for movement sessions. Certainly turning a step-up into a step-up-and-jump combo is more exciting and fun, but with the increased intensity comes increased risk. If you’ve been through our Education Courses the acronym FLAC should be familiar to you. FLAC stands for: FOCUS on the movement, LEARN the appropriate level of progression, APPLY the training load, CHALLENGE your goals. This is an amazing rule of thumb to take into consideration when you’re creating a workout. Bottom line: your goal should be to select the appropriate level of exercises that keep your clients safe, injury-free, and confident during their workouts - and most of all, to always analyze your choices and then determine if the potential “reward” is actually worth it.
Check out the next blog in this series: Part 4, Plank to Crawl.
To learn more about movement-based training, check our the TRX Education Journey.

The Conditioning Rope Challenge
Conditioning Ropes (also known as battle ropes) have emerged on the training scene over the past ten years in large part thanks to the pioneering programming work of John Brookfield with Ingrid Marcum. While conditioning ropes still remain on the fringe of the mainstream, this style of training continues to gather momentum and popularity.
There are a number of different ways to utilize Conditioning Ropes (generally a rope that is 1.5” in diameter and 40’ to 50’ long) but for the purpose of this article we will be looking at the most common use for them dubbed the velocity / wave principle by Brookfield and Marcum. This involves using an upper body movement to send a wave or series of waves down the length of the rope toward it’s anchor point.
I began integrating the modality into my own training about 8 years ago and like many, I utilized them primarily for short duration, high intensity interval bouts, experiencing good success and activating a type of training that previously had not been possible.
This was until I had the opportunity to talk with my friend, the aforementioned Ingrid Marcum about how much fun I was having involving conditioning ropes in my workouts and she offered the following input.
The conversation went a little like this…
Ingrid: “… Well if you’re using them at all you really should be able to do them for 20 minutes.”
Me: (incredulously) “IN A ROW?!”
Ingrid: (casually) “Yup”
Me: (in disbelief) “Surely you’re using different arm patterns and stances?!”
Ingrid: (still casually) “No… alternating waves, hip to shoulder amplitude, about 120 waves per minute and each wave has to hit the anchor point”
Me: “Oh…” (read - “You must be out of your DAMN MIND!!”)
Ingrid: “If you can do it continuously for 4 min you can do it for 20”
Me: “WHAT?!”
Ingrid: “Seriously… you should try it! It’s a fun challenge!”…
At that point I excused myself from the conversation and essentially ran away. I honestly thought that she was properly pulling my leg but still… What if?…
Two weeks later toward the end of March, there I was - out in the melting snow on a field near my home in the Canadian Rockies with the intent on giving it a try.
So while I was dumb enough to try it, I was smart enough to set my timer to a series of 20 intervals consisting of 40 sec work with 20 seconds rest. My plan was to go for as long as I could continuously and then fall back to the :40 on / :20 off intervals when the wheels inevitably fell off the wagon so that I could finish out the 20 min.
So how did it go?…
Let’s say it wasn’t long before I retreated to the intervals and it didn’t get much better from there. While I was able to make the 20 minutes using the intervals, to call it “U-G-L-Y” would have been kind.
In retrospect while I had been near haughty about my “retreat to the timer” strategy I was too obtuse to realize that using a battle rope on a field of melting snow would result in the rope getting wet… which, as it turns out, means HEAVY. Oh yes… and grass is a high friction surface!
It would be weeks before this realization would come to me, as at the time I was directing all blame squarely toward Ingrid and her “stupid challenge.”
Fast forward about 6 weeks, on May 11th (my birthday) I received the following public Facebook message from Ingrid…
“Happy Birthday!…Finished that challenge yet? ;-)” Nice. Calling me out on my birthday… some friend she is!
OK - so it worked. And not only did her motivational strategy work, in that I re-engaged with the challenge, but I also had some amazing learnings:
1) 20 minutes of continuous battle rope is not only possible, but actually reasonable.
2) If you can do 4 minutes consecutively you actually CAN do 20 minutes.
3) It is a tremendously effective cardiovascular and muscular endurance based functional and athletic workout, with added benefits of core strength and mental tenacity.
4) You cannot understand the nuances and movement efficiencies of this type of training without marching through the hard miles of continuous work.
This last point is an incredibly important one! I found that after completing the challenge of sustained battling rope work, my ability to perform high intensity rope based intervals was significantly elevated due to all of the movement efficiencies that I had learned during my continuous efforts. I was more efficient in my moment and therefore more effective when it came time for high output efforts.
Now having completed the challenge I often perform the 20 minutes as a component of my regular workouts, modifying it at times to include alternate upper and lower body motor patterns to create the waves or layer intense intervals within the continuous work.
I also often use shorter sustained efforts of 5 to 10 minutes as a method for movement prep and maintain that it is one of the best modalities to improve shoulder and rotator cuff health.
I firmly believe that it is some of the best athletic and coordinative training available that has exceptional carry over to many common activities. The benefits of this training style truly go on and on!
So how does one bite off such an initially daunting challenge?
Step 1: Make a kick ass playlist to keep you motivated and help you mark the time.
Note: If you select music that adheres to about a 120 bpm count you will be able to utilize it as an intensity meter as well
Step 2: Use one of the many timer apps (I use “Seconds Pro”) to help you progress to the full continuous 20 minutes
Step 3: Follow the following training progression where you successfully complete each stage with high movement quality before leveling up to the next.
Perform these workouts ideally twice per week and not more than 3 times and you will be amazed how quickly your abilities improve and you achieve the challenge.
This internationally renowned expert is a founding member of the revolutionary training company TRX® and an award winning presenter who’s been featured at conferences and events all over the world including an appearance on the TEDx stage. Fraser combines an animated, entertaining style with his knowledge and gift to motivate and inspire. His provocative writing and presentations have been known to stretch the minds of his audiences and provide relevant and effective training solutions in a practical setting.